Jekyll2026-06-10T19:13:05+00:00https://thisroman.dev/feed.xmlthisroman.devHey folks, I post some articles about technology and tricks & tips how to do some stuff in dev environment. 🚀<br/> My CV page is [here](https://cv.thisroman.dev){:target="_blank"}.
Roman Pinchukhi@thisroman.devhttps://thisroman.devDocker Engine v29: Fixing “API Version Mismatch” Error2025-11-28T00:00:00+00:002025-11-28T00:00:00+00:00https://thisroman.dev/2025/11/28/docker-engine-29-api-version-fix
If you’ve recently upgraded to Docker Engine - Community Version 29, you might have hit a frustrating API version mismatch error.
Specifically, you might see an error indicating that a minimum API version >= 1.44 is required. This often happens when your tools or CI/CD agents are trying to communicate with the updated daemon using an older API protocol, and the new Docker default policies are too strict.
As an Automation Engineer, I encounter this when legacy scripts or older docker-compose binaries clash with the bleeding-edge runtime. We need a way to bridge that gap without downgrading the entire engine.
Here is the quick fix to force Docker to accept a lower minimum API version.
The Fix: Configure daemon.json
The solution is to explicitly tell the Docker daemon to support an older API version. We do this by modifying (or creating) the /etc/docker/daemon.json file.
We are going to set the min-api-version to 1.32. This is a robust baseline that supports most tools while still allowing the daemon to run its latest core.
Step 1: Edit the Configuration
Open the daemon configuration file in your text editor:
sudo nano /etc/docker/daemon.json
Add (or merge) the following configuration object:
{"min-api-version":"1.32"}
Warning: If your daemon.json already contains other settings (like insecure registries or log drivers), make sure you append this key correctly to the existing JSON object. Invalid JSON will prevent Docker from starting.
Step 2: Restart Docker Service
Configuration changes only apply after a service restart. Reload the daemon:
sudo systemctl restart docker
Step 3: Verify the Fix
Ensure the service is back up and verify the API negotiation:
docker version
You should now see that the daemon is willing to speak with older clients.
Why this works
Docker v29 pushes the envelope on API standards. By default, it may deprecate older API versions to encourage security and feature parity. However, in the real world of enterprise automation, we don’t always control the client version (e.g., a Jenkins plugin or a vendor-locked utility).
Setting "min-api-version": "1.32" effectively lowers the “minimum height requirement” for this ride, letting your existing automation suite continue to function with the modern engine.
Keep automating. 🫡
]]>Roman Pinchukhi@thisroman.devhttps://thisroman.dev= 1.44" requirement in Docker v29.]]>How to Use crontab Like a Pro2025-04-27T00:00:00+00:002025-04-27T00:00:00+00:00https://thisroman.dev/2025/04/27/how-to-use-crontab-like-pro
If you ever needed to run a command automatically at a certain time on Linux, crontab is what you’re looking for. It’s simple once you get the pattern down.
Here’s everything you need to know to start — and actually understand what you’re doing.
What is crontab?
In its simplest form, crontab is a scheduler on Unix-based systems that automates tasks.
It executes commands or scripts at specific intervals, which you define in a crontab file. This is the file where cron jobs are set, and it’s the tool behind most of the scheduled processes you interact with daily.
You can think of cron as your personal assistant — once you set the schedule, cron takes over and makes sure everything happens on time, without further intervention from you. It runs tasks at the minute level (every 1 minute, every hour, every day, etc.), so it’s great for repetitive tasks.
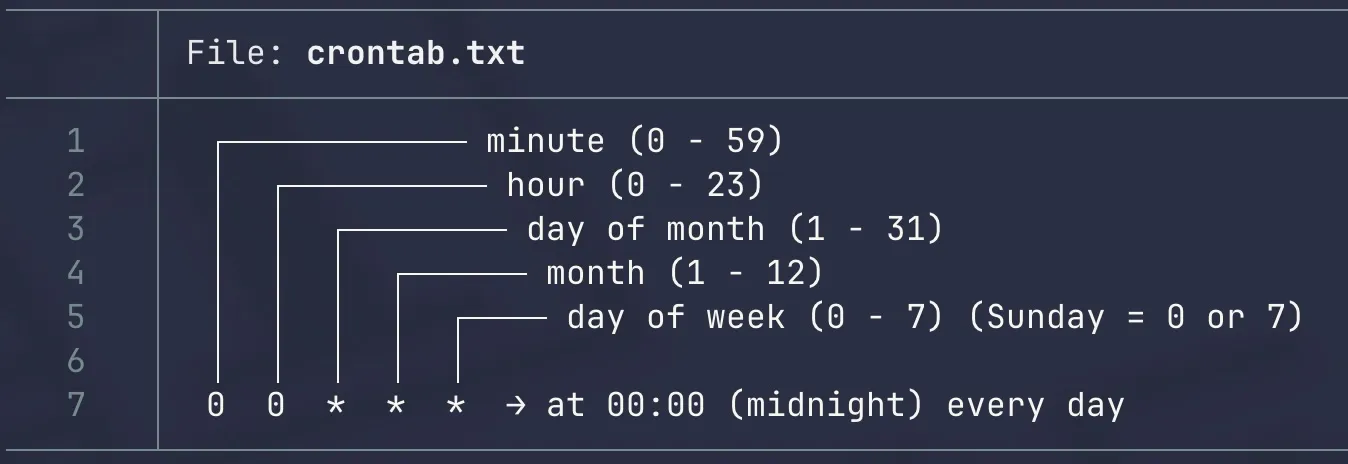
Crontab Syntax Explained
Every cron job follows a schedule format and is paired with a command to execute. The syntax might seem a bit tricky at first, but once you get the hang of it, it becomes second nature. Here’s the basic layout:
┌───────────── minute (0–59)
│ ┌───────────── hour (0–23)
│ │ ┌───────────── day of month (1–31)
│ │ │ ┌───────────── month (1–12)
│ │ │ │ ┌───────────── day of week (0–7)(Sunday = 0 or 7)
│ │ │ │ │
│ │ │ │ │
***** command_to_execute
Explanation of Each Field:
Minute (0-59) – When during the hour the command should run (e.g., 0 means at the start of the hour).
Hour (0-23) – The hour at which the command should run (e.g., 14 means 2 PM).
Day of Month (1-31) – The day of the month to execute the command (e.g., 15 for the 15th).
Month (1-12) – The month of the year when the command should execute (e.g., 5 for May).
Day of Week (0-7) – The day of the week (0 or 7 = Sunday, 1 = Monday, etc.).
Quick Examples
Let’s break down some examples of crontab lines for clarity:
Crontab Line
Meaning
0 0 * * *
Run every day at midnight (00:00).
30 6 * * *
Run every day at 6:30 AM.
0 */2 * * *
Run every 2 hours.
0 0 1 * *
Run once a month on the 1st day at midnight.
0 0 * * 0
Run every Sunday at midnight.
Special Crontab Macros
Sometimes, you want to avoid remembering the exact numbers. Cron provides some convenient shortcuts you can use instead of the typical numbers. These are called macros, and they make your crontab much more readable:
Macro
Equivalent
Meaning
@reboot
—
Run once at startup (every reboot).
@yearly
0 0 1 1 *
Run once a year (January 1st).
@annually
0 0 1 1 *
Alias for @yearly.
@monthly
0 0 1 * *
Run once a month (on the 1st).
@weekly
0 0 * * 0
Run once a week (Sunday).
@daily
0 0 * * *
Run once a day (at midnight).
@midnight
0 0 * * *
Same as @daily.
@hourly
0 * * * *
Run every hour.
You can also use these macros in your crontab file for simplicity.
No need to manually type out all those numbers!
Crontab Types: Which One Are You Editing?
There are different types of crontabs that you may be working with:
User crontab: This is where your user sets their own cron jobs. You can access it by running the command:
crontab -e
System crontab: This is a system-wide crontab located at /etc/crontab, and it’s where cron jobs that affect the whole system are configured. It requires the user field, which specifies which user the job should run as. You would edit this file with:
sudo nano /etc/crontab
Example of a system crontab entry:
# m h dom mon dow user command
0 0 *** root /path/to/script.sh
The Role of MAILTO in Crontab
By default, when a cron job produces any output (whether it’s a success message or an error), cron tries to send an email with that output. The MAILTO variable controls where this output goes.
Here’s how it works:
MAILTO=“your@email.com”: Cron will send all output (standard and error) to the specified email address.
Example:
MAILTO="your@email.com"
0 0 *** /your/script.sh
With this, you’ll receive an email every time the script produces any output.
MAILTO=””: This prevents cron from sending emails. If your job produces any output (even errors), cron will silently ignore it.
Example:
MAILTO=""
0 0 *** /your/script.sh
This can be helpful if you don’t want to clutter your inbox with cron job outputs.
Best Practices for Cron Jobs
While cron jobs are pretty straightforward, here are some best practices to keep your crontab organized and efficient:
Always set MAILTO=”“ if you don’t need emails. This prevents unnecessary notifications.
Be explicit about paths. Cron jobs run with a minimal environment. Always provide full paths to the commands you want to run, and even the environment variables.
Test your commands manually before adding them to crontab to ensure they work properly.
Use cron’s macros for simplicity and readability.
Real-World Example: Controlling an LED
I have a small SBC Server and want to automate its LED by cron job.
This will turn the LED off at midnight and set it to heartbeat mode at 6:30 AM.
Simple and effective.
Final Thoughts
Crontab is the heartbeat of automated task scheduling on Linux. It gives you the power to automate everything from system maintenance to custom scripts.
By understanding its format, macros, and output control options, you can easily set up reliable cron jobs that work like clockwork.
Cron is the silent worker of your system — and with these tips, you’ll be able to make it work even harder for you.
TL;DR for crontab command
crontab
Schedule cron jobs to run on a time interval for the current user.
More information: https://crontab.guru/.
Edit the crontab file for the current user:
crontab -e
Edit the crontab file for a specific user:
sudo crontab -e -u user
Replace the current crontab with the contents of the given file:
crontab path/to/file
View a list of existing cron jobs for current user:
crontab -l
Remove all cron jobs for the current user:
crontab -r
Sample job which runs at 10:00 every day (* means any value):
0 10 * * * command_to_execute
Sample crontab entry, which runs a command every 10 minutes:
*/10 * * * * command_to_execute
Sample crontab entry, which runs a certain script at 02:30 every Friday:
30 2 * * Fri /absolute/path/to/script.sh
]]>Roman Pinchukhi@thisroman.devhttps://thisroman.devDeepSeek 🐳 on ur local host right now!2025-01-30T00:00:00+00:002025-01-30T00:00:00+00:00https://thisroman.dev/2025/01/30/deepseek-on-ur-local-host-right-now
Hello, folks! 🙋🏻♂️
Today, I want to show you how to run Blue Whale on your local computer and make its web UI accessible over the internet. I’ll guide you through the setup step by step, so stay tuned!
What will be need:
MacBook Air 13 M3 16GB RAM 512GB Disk (In my case)
Docker Desktop or Docker CE w/ Compose ability
Free Time
And as a bonus is registered Domain Name on Cloudflare for remote access for ur blue whale 🐳
Docker Compose File
Let’s open a Terminal (I do prefer iTerm 2) and build some awesome compose.yml. I recommend to make a new folder for it before:
I added health check for ollama service and open-webui depends on that check.
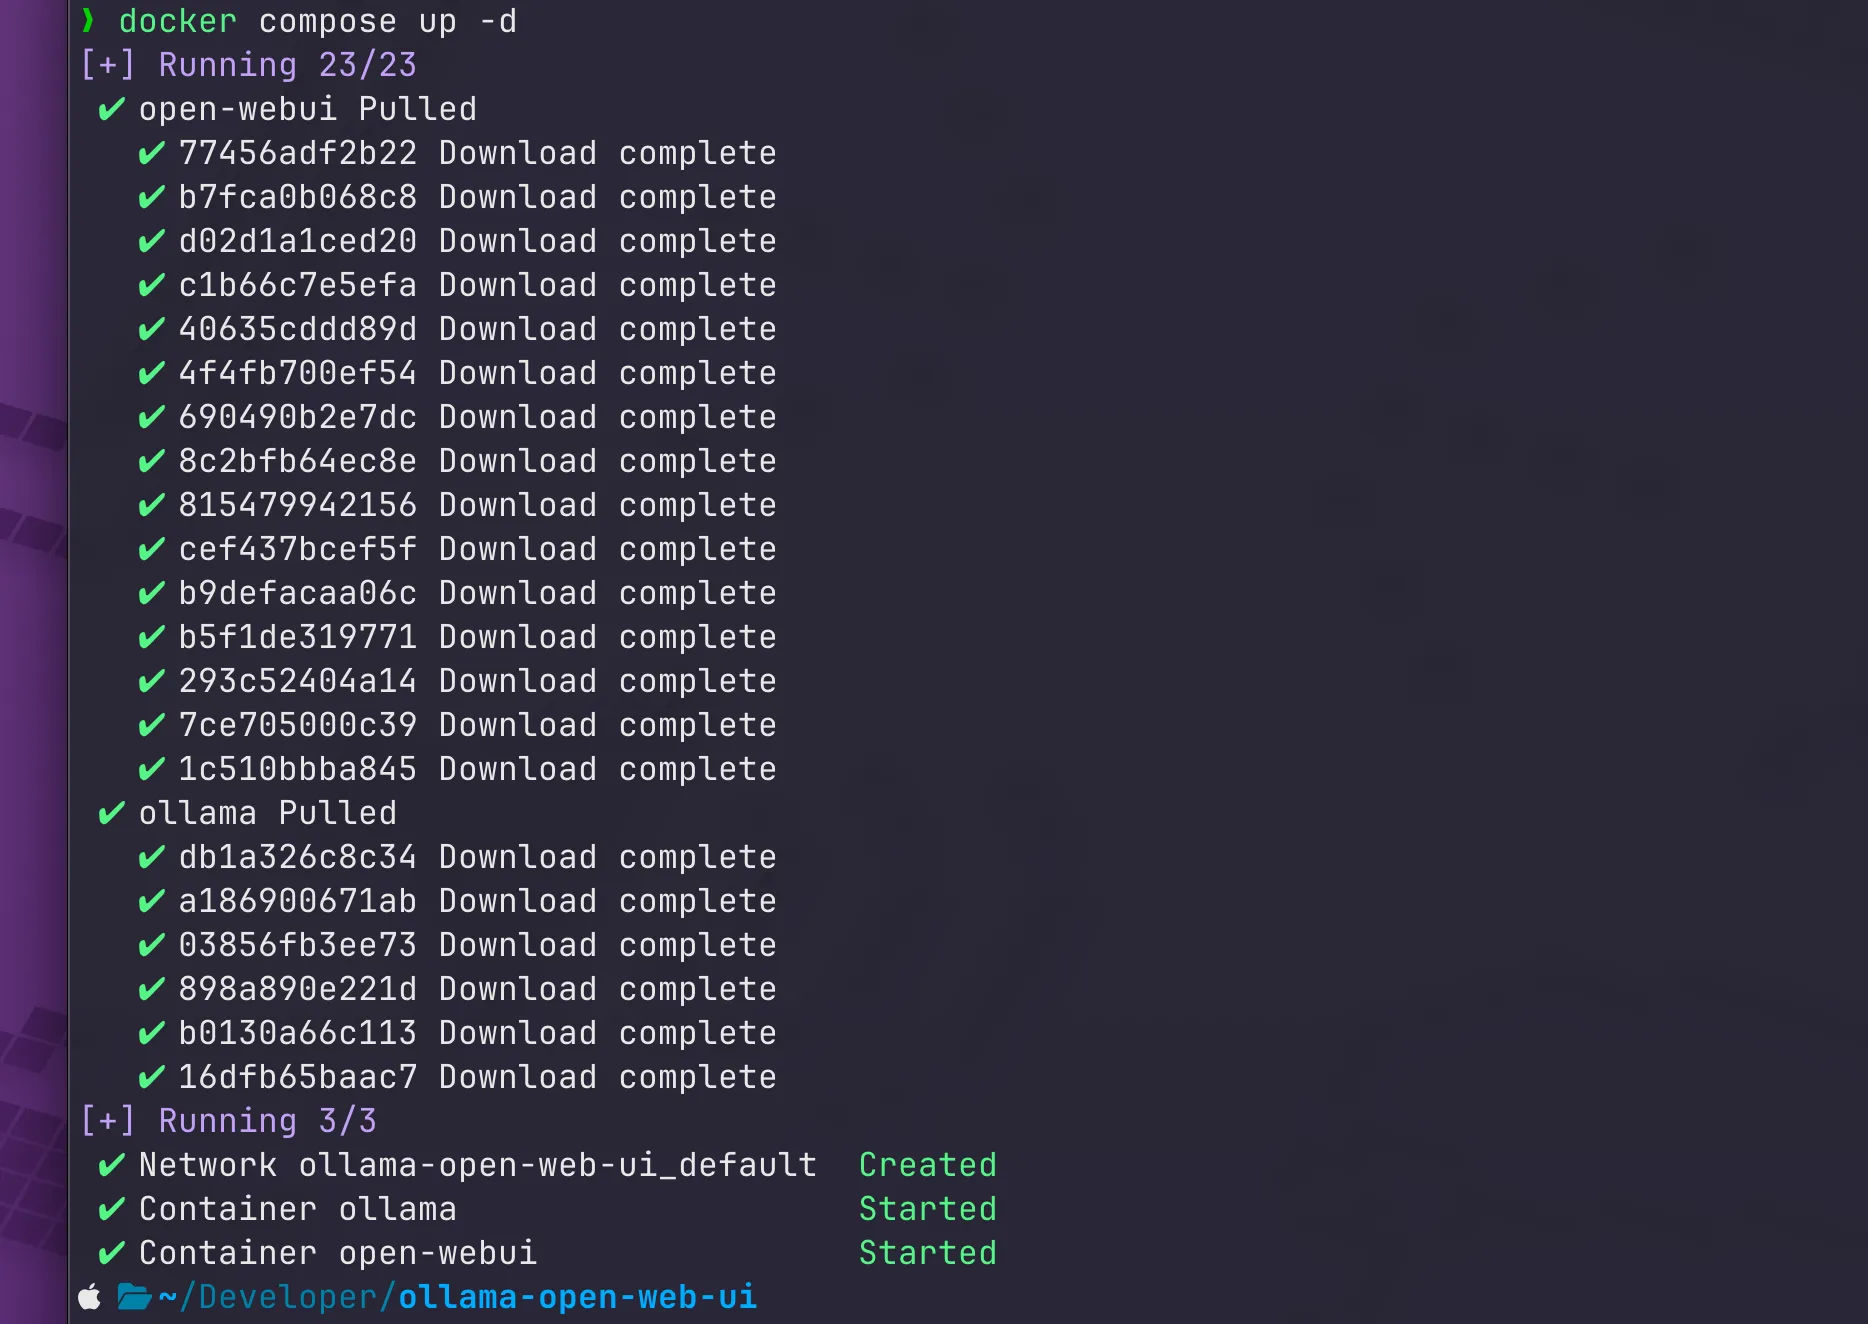
So, we have compose file. It’s time to run:
docker compose up -d
Docker’ll see that images aren’t downloaded and try to obtain them (ollama weighs 7.29GB and open-webui weighs 5.27GB)
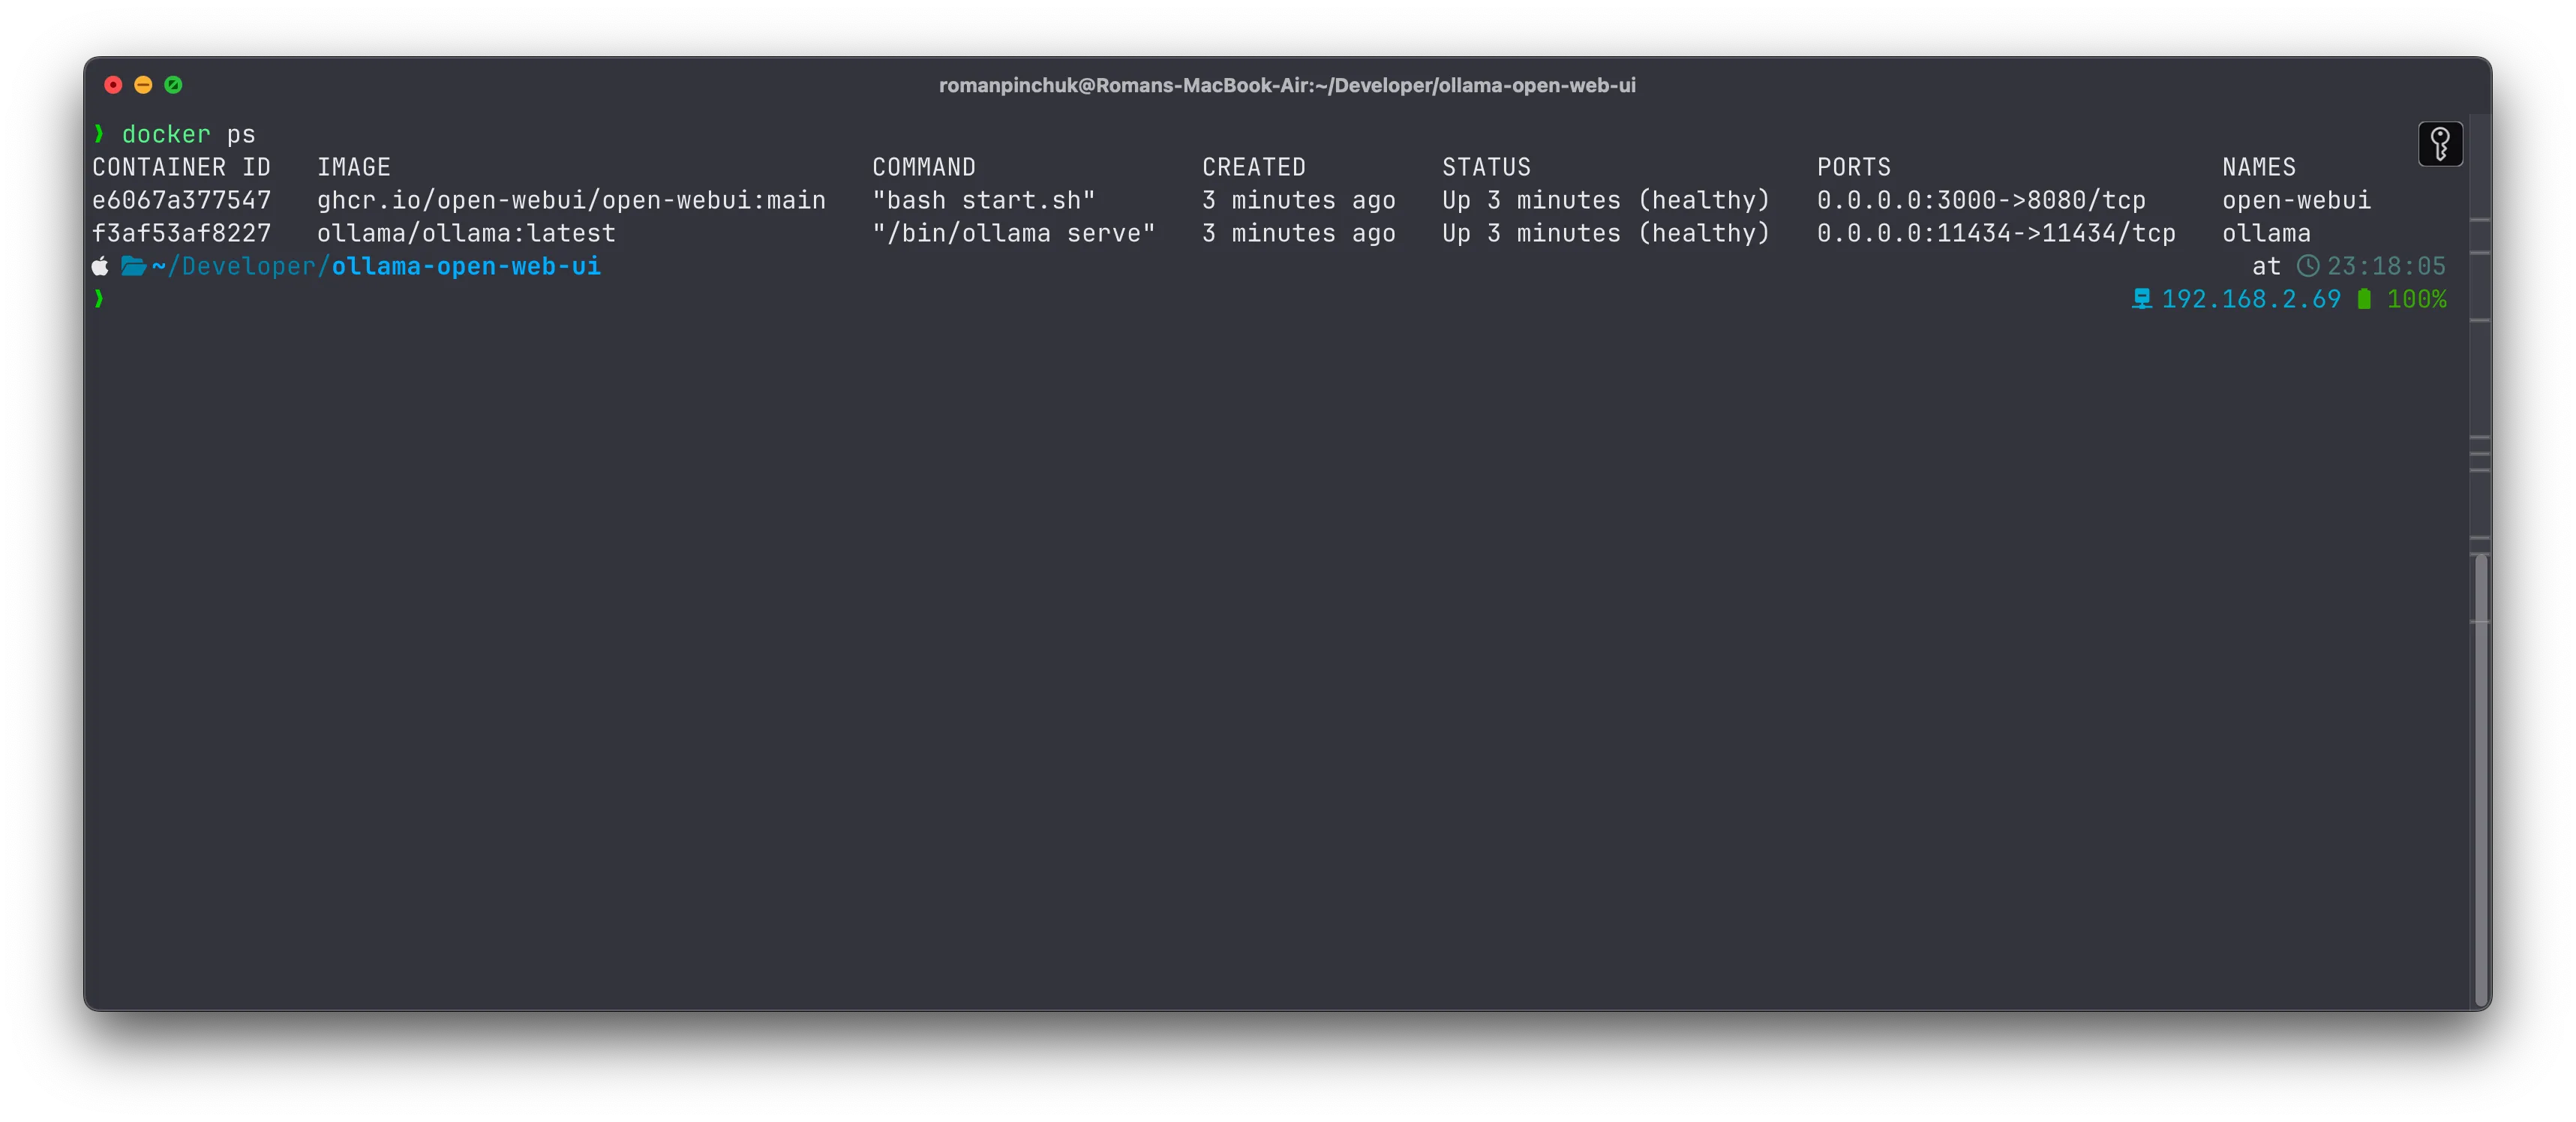
Let’s check if them are healthy guys and running:
docker ps
Web UI Configuration
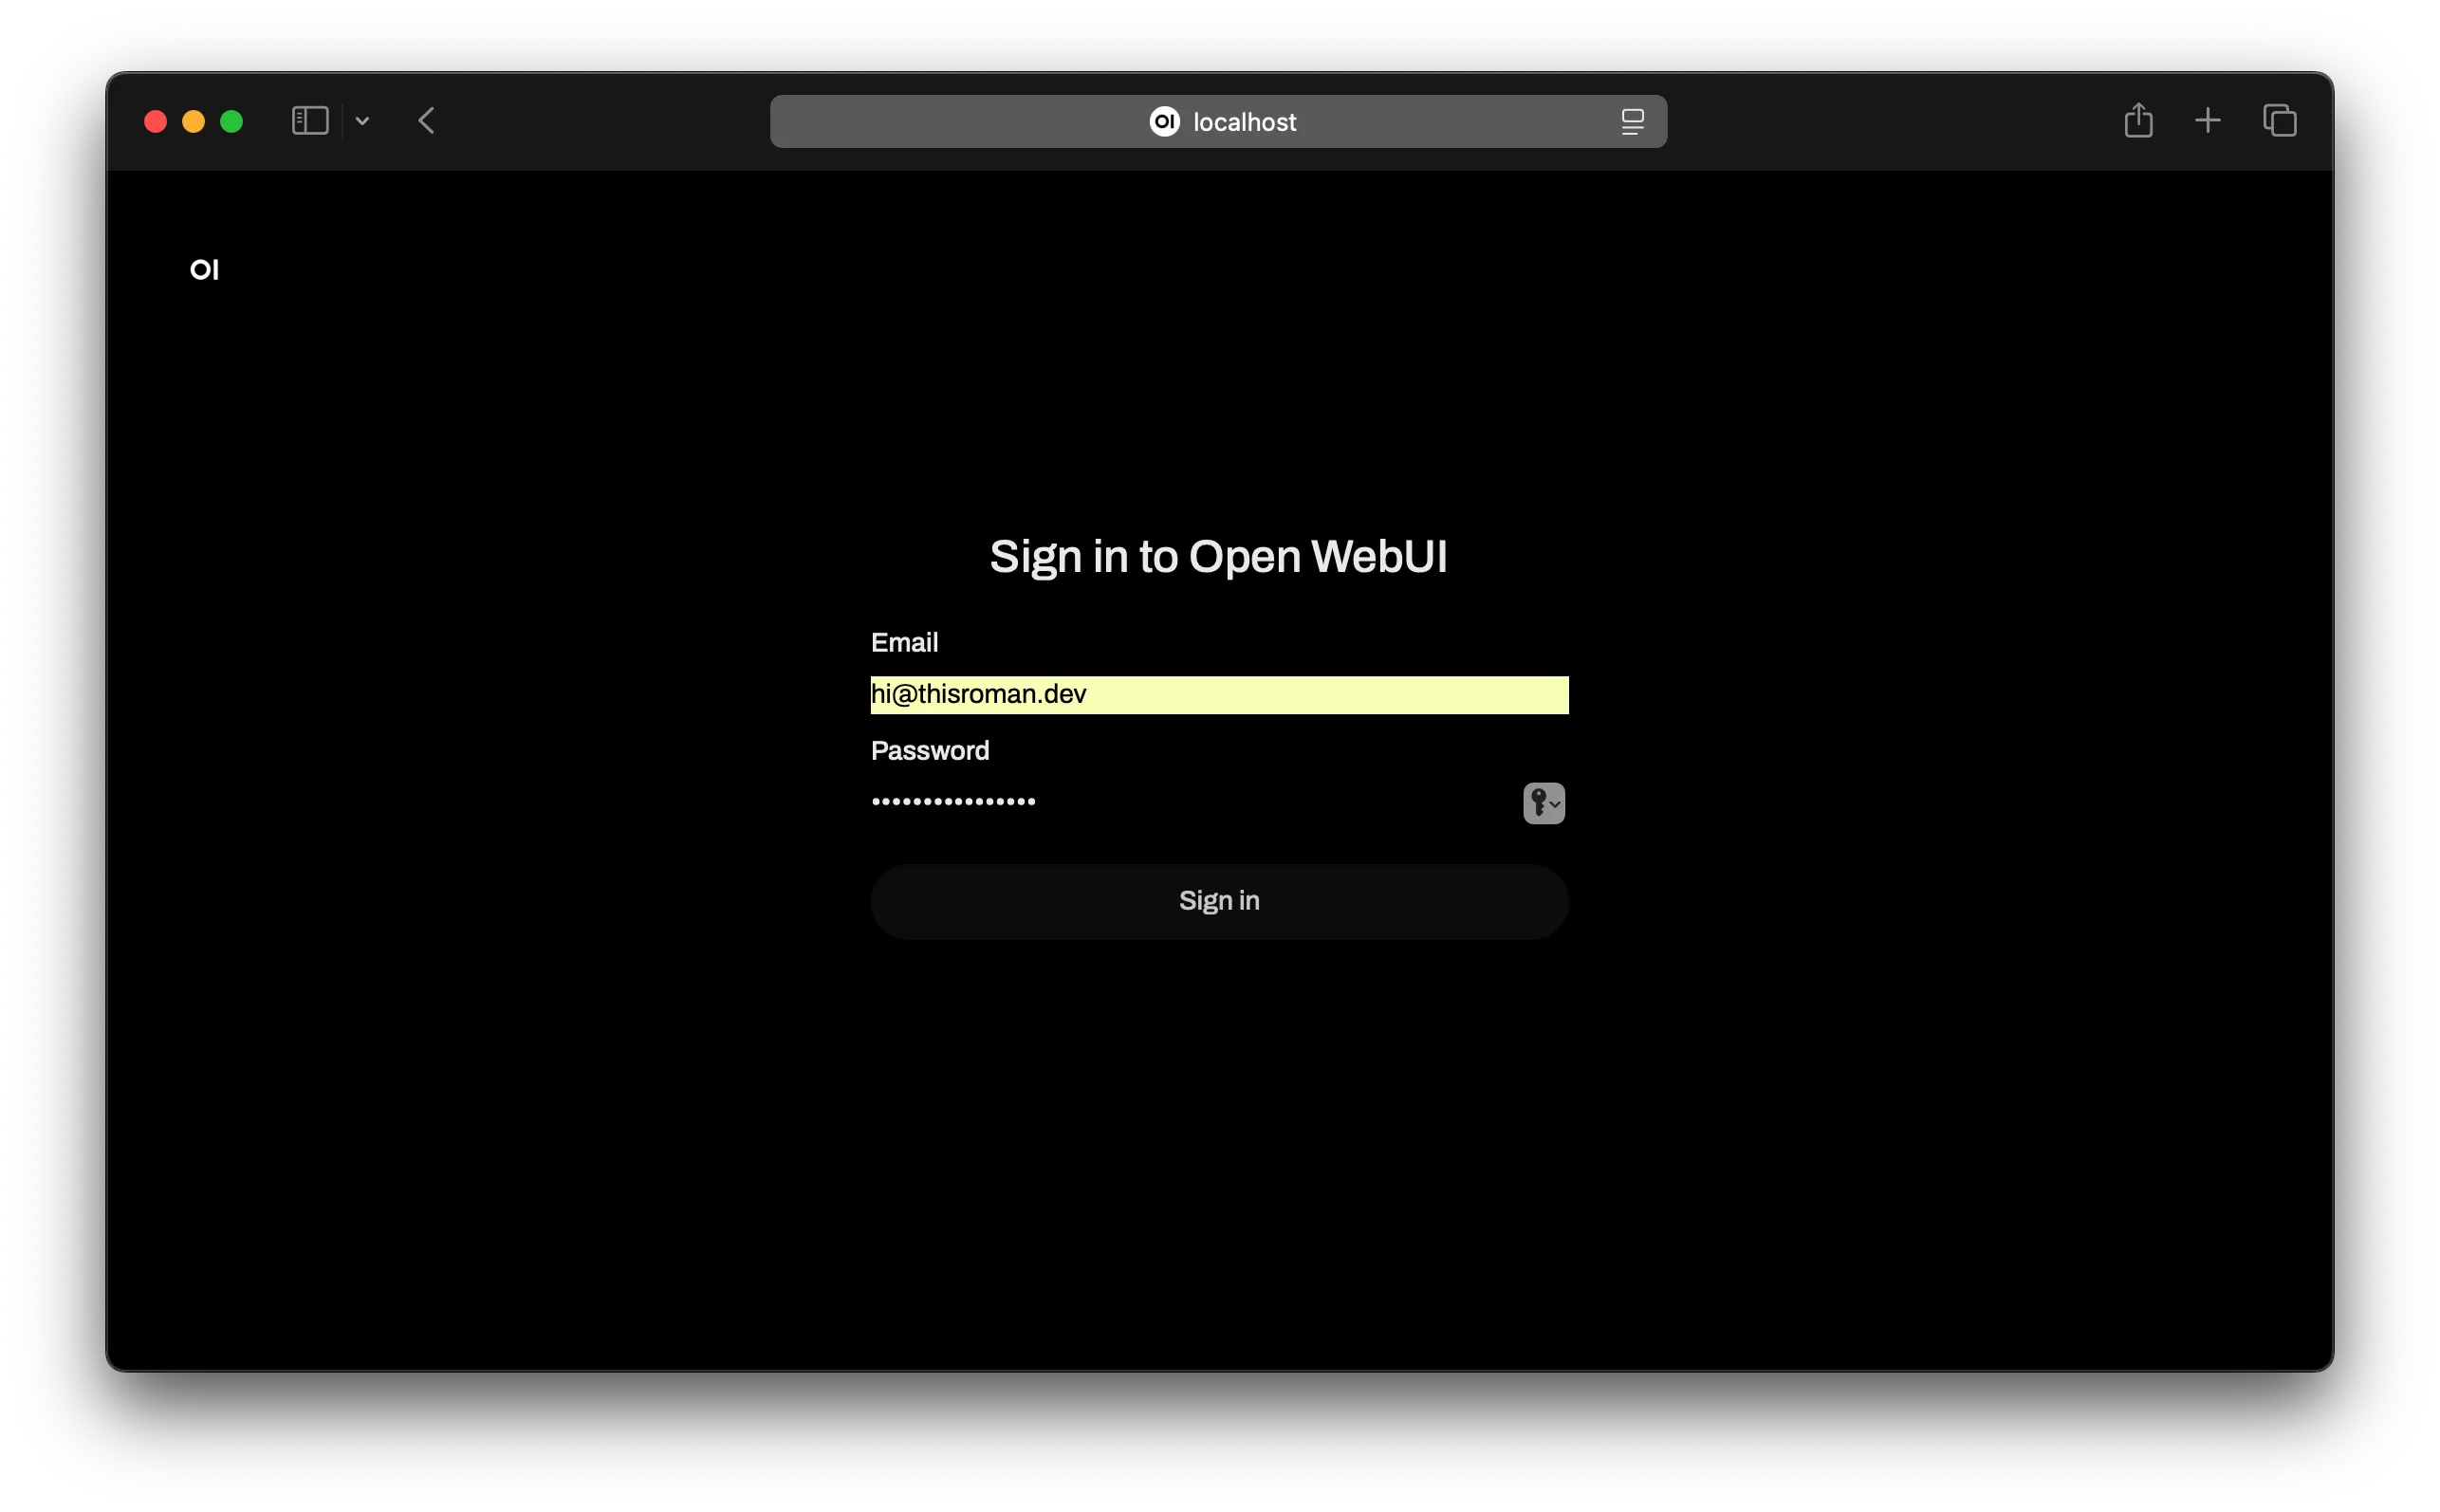
Ok, everything is ok. Now, try to open web ui by following localhost:3000 address:
Use your email and fill some password for initial setup. That user is an admin.
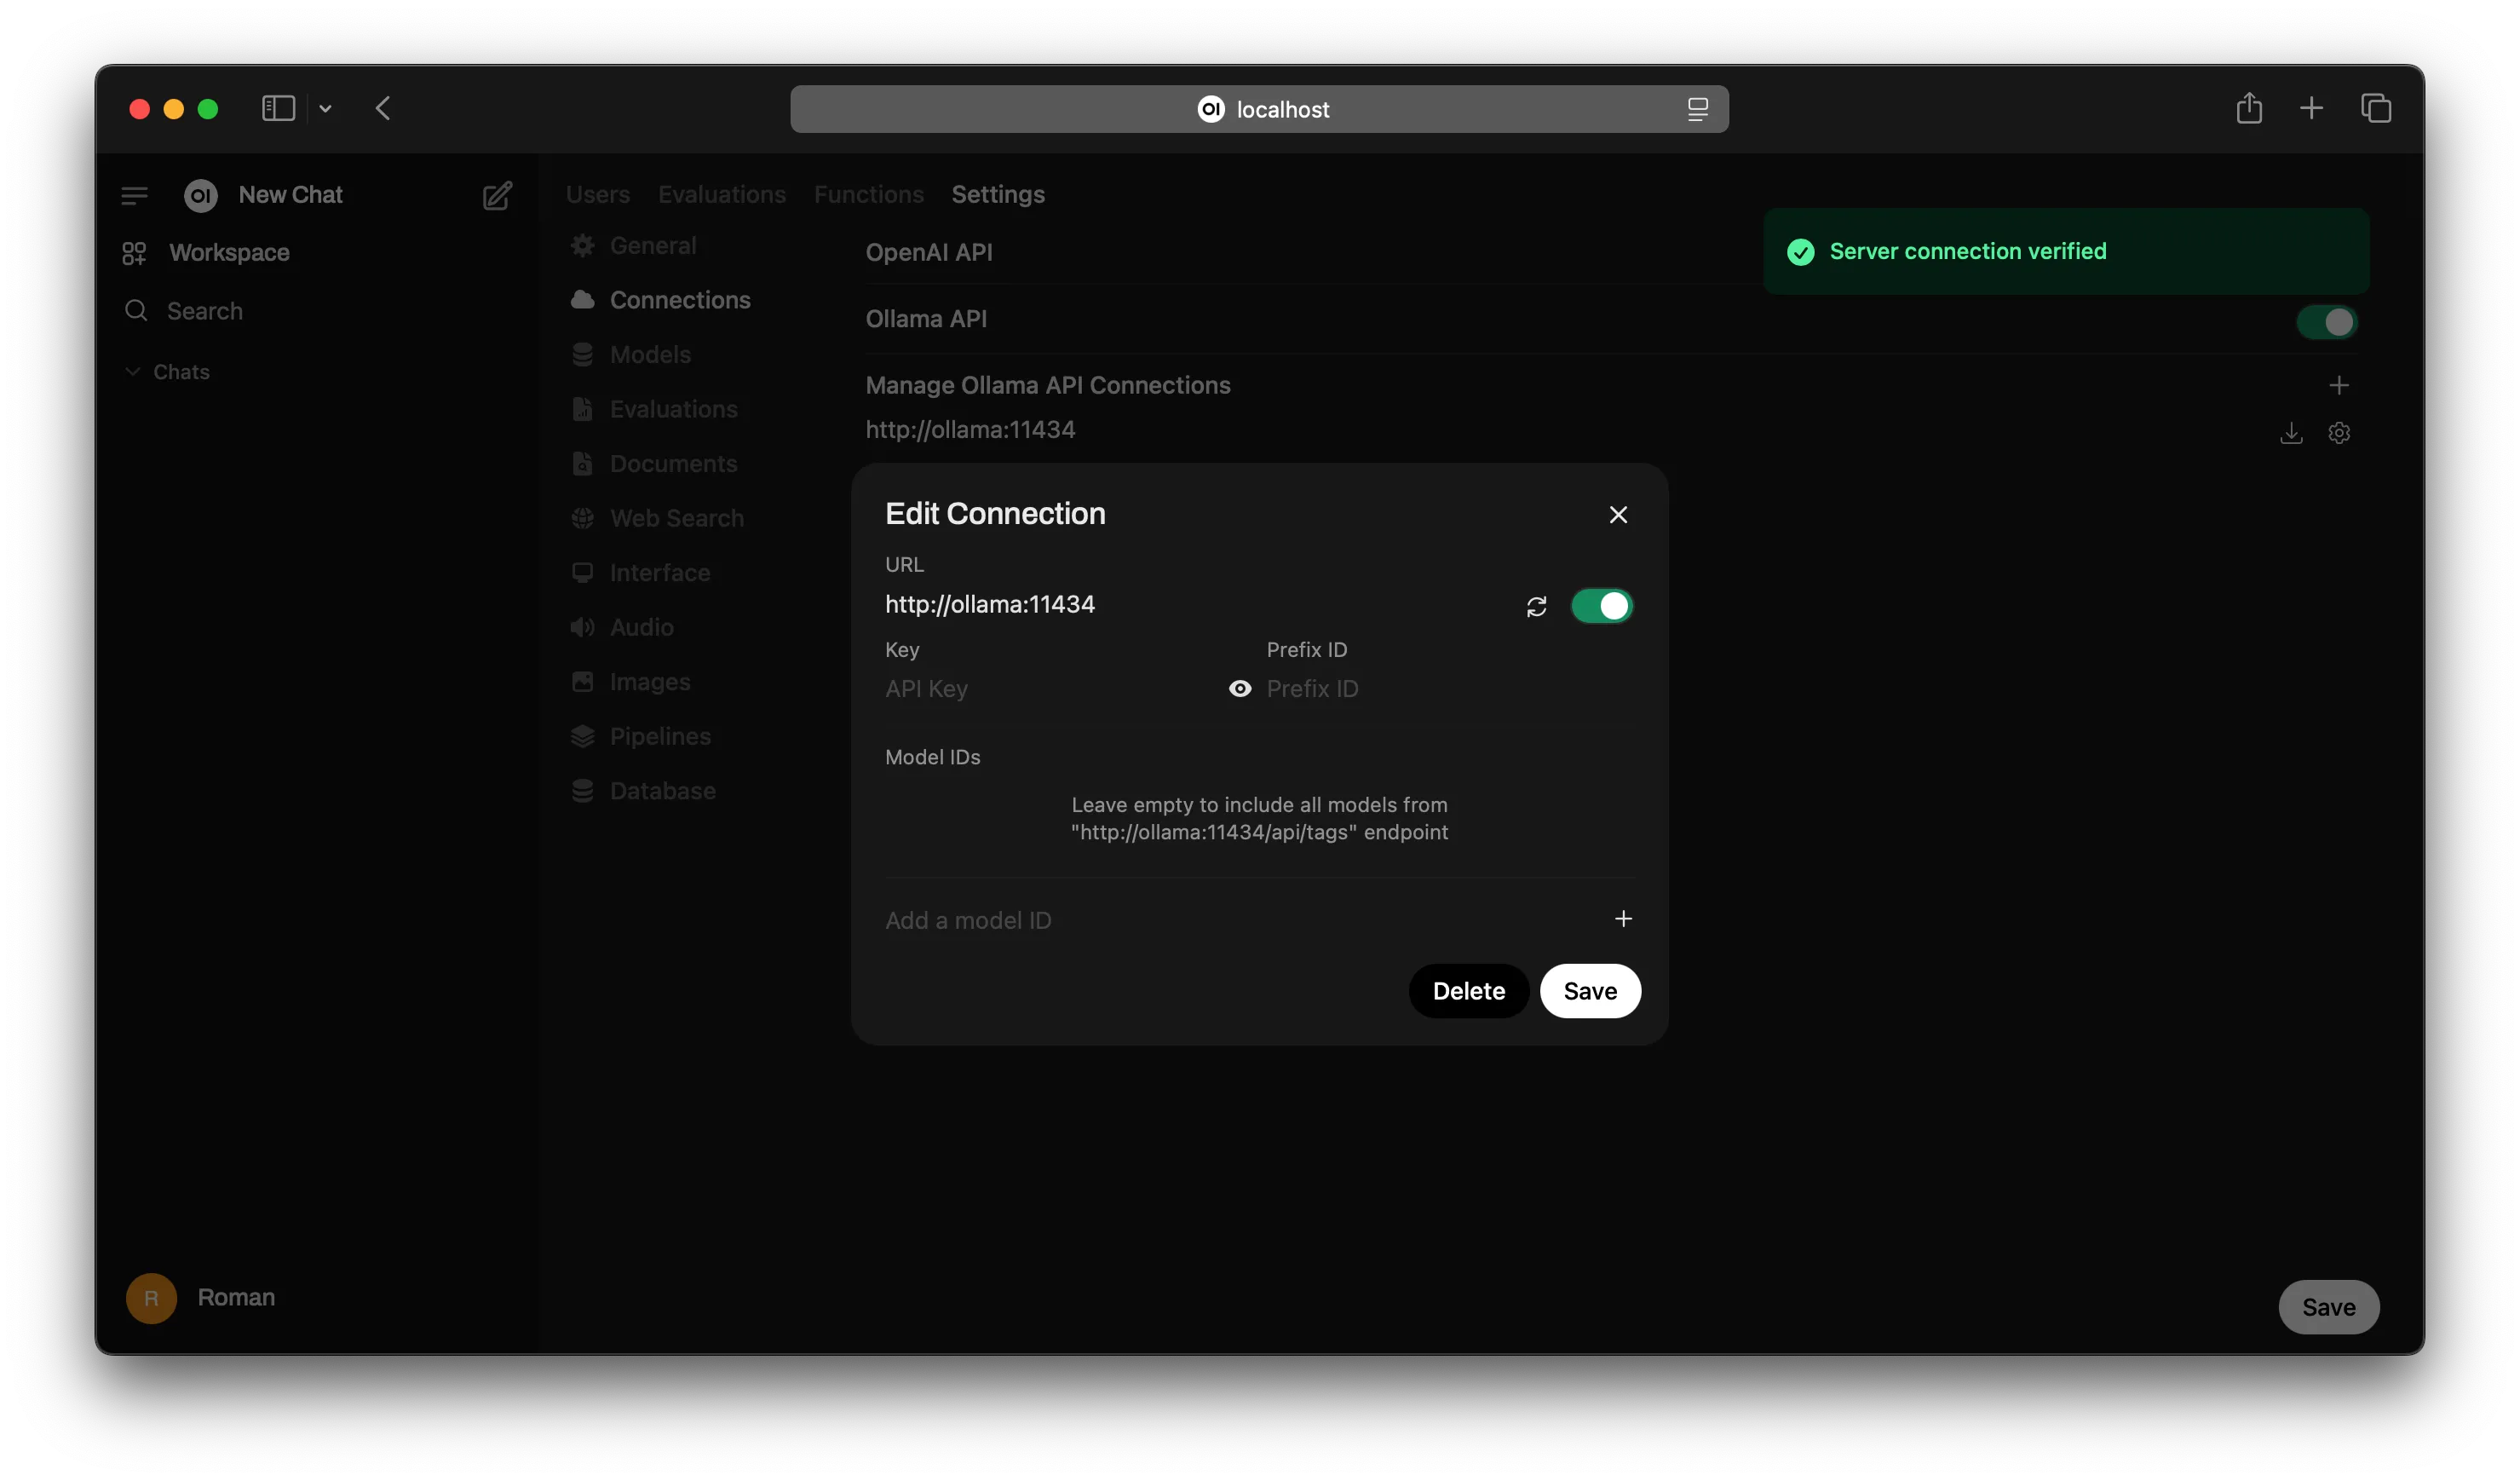
After that need to check connection to ollama. Click on an avatar (right-upper corner) → Admin Panel → Settings → Connections.
In a case if you don’t use ClosedOpenAI API, I suggest to disable this feature. Ollama API should be pointed to http://ollama:11434 because we defined in compose.yml file. Then, click on the gear icon → and click on refresh icon. We should see that connection is verified as shown below.
Also, I turned on a web searching using DuckDuckGo Search Engine. To enabling, open Admin Panel → Settings → Web Search → Enable Web Search → Select duckduckgo in Web Search Engine → Save button at the bottom of the page.
Ollama Model Pulling
So, it’s time to pull the DeepSeek R1 model into the ollama. In my case I use a distilled model with 1.5b parameters but there’re different options until 671b. You can check this out here https://ollama.com/library/deepseek-r1:1.5b.
Return to UI and refresh again to a model updating and maybe refresh the page.
Chatting With Model
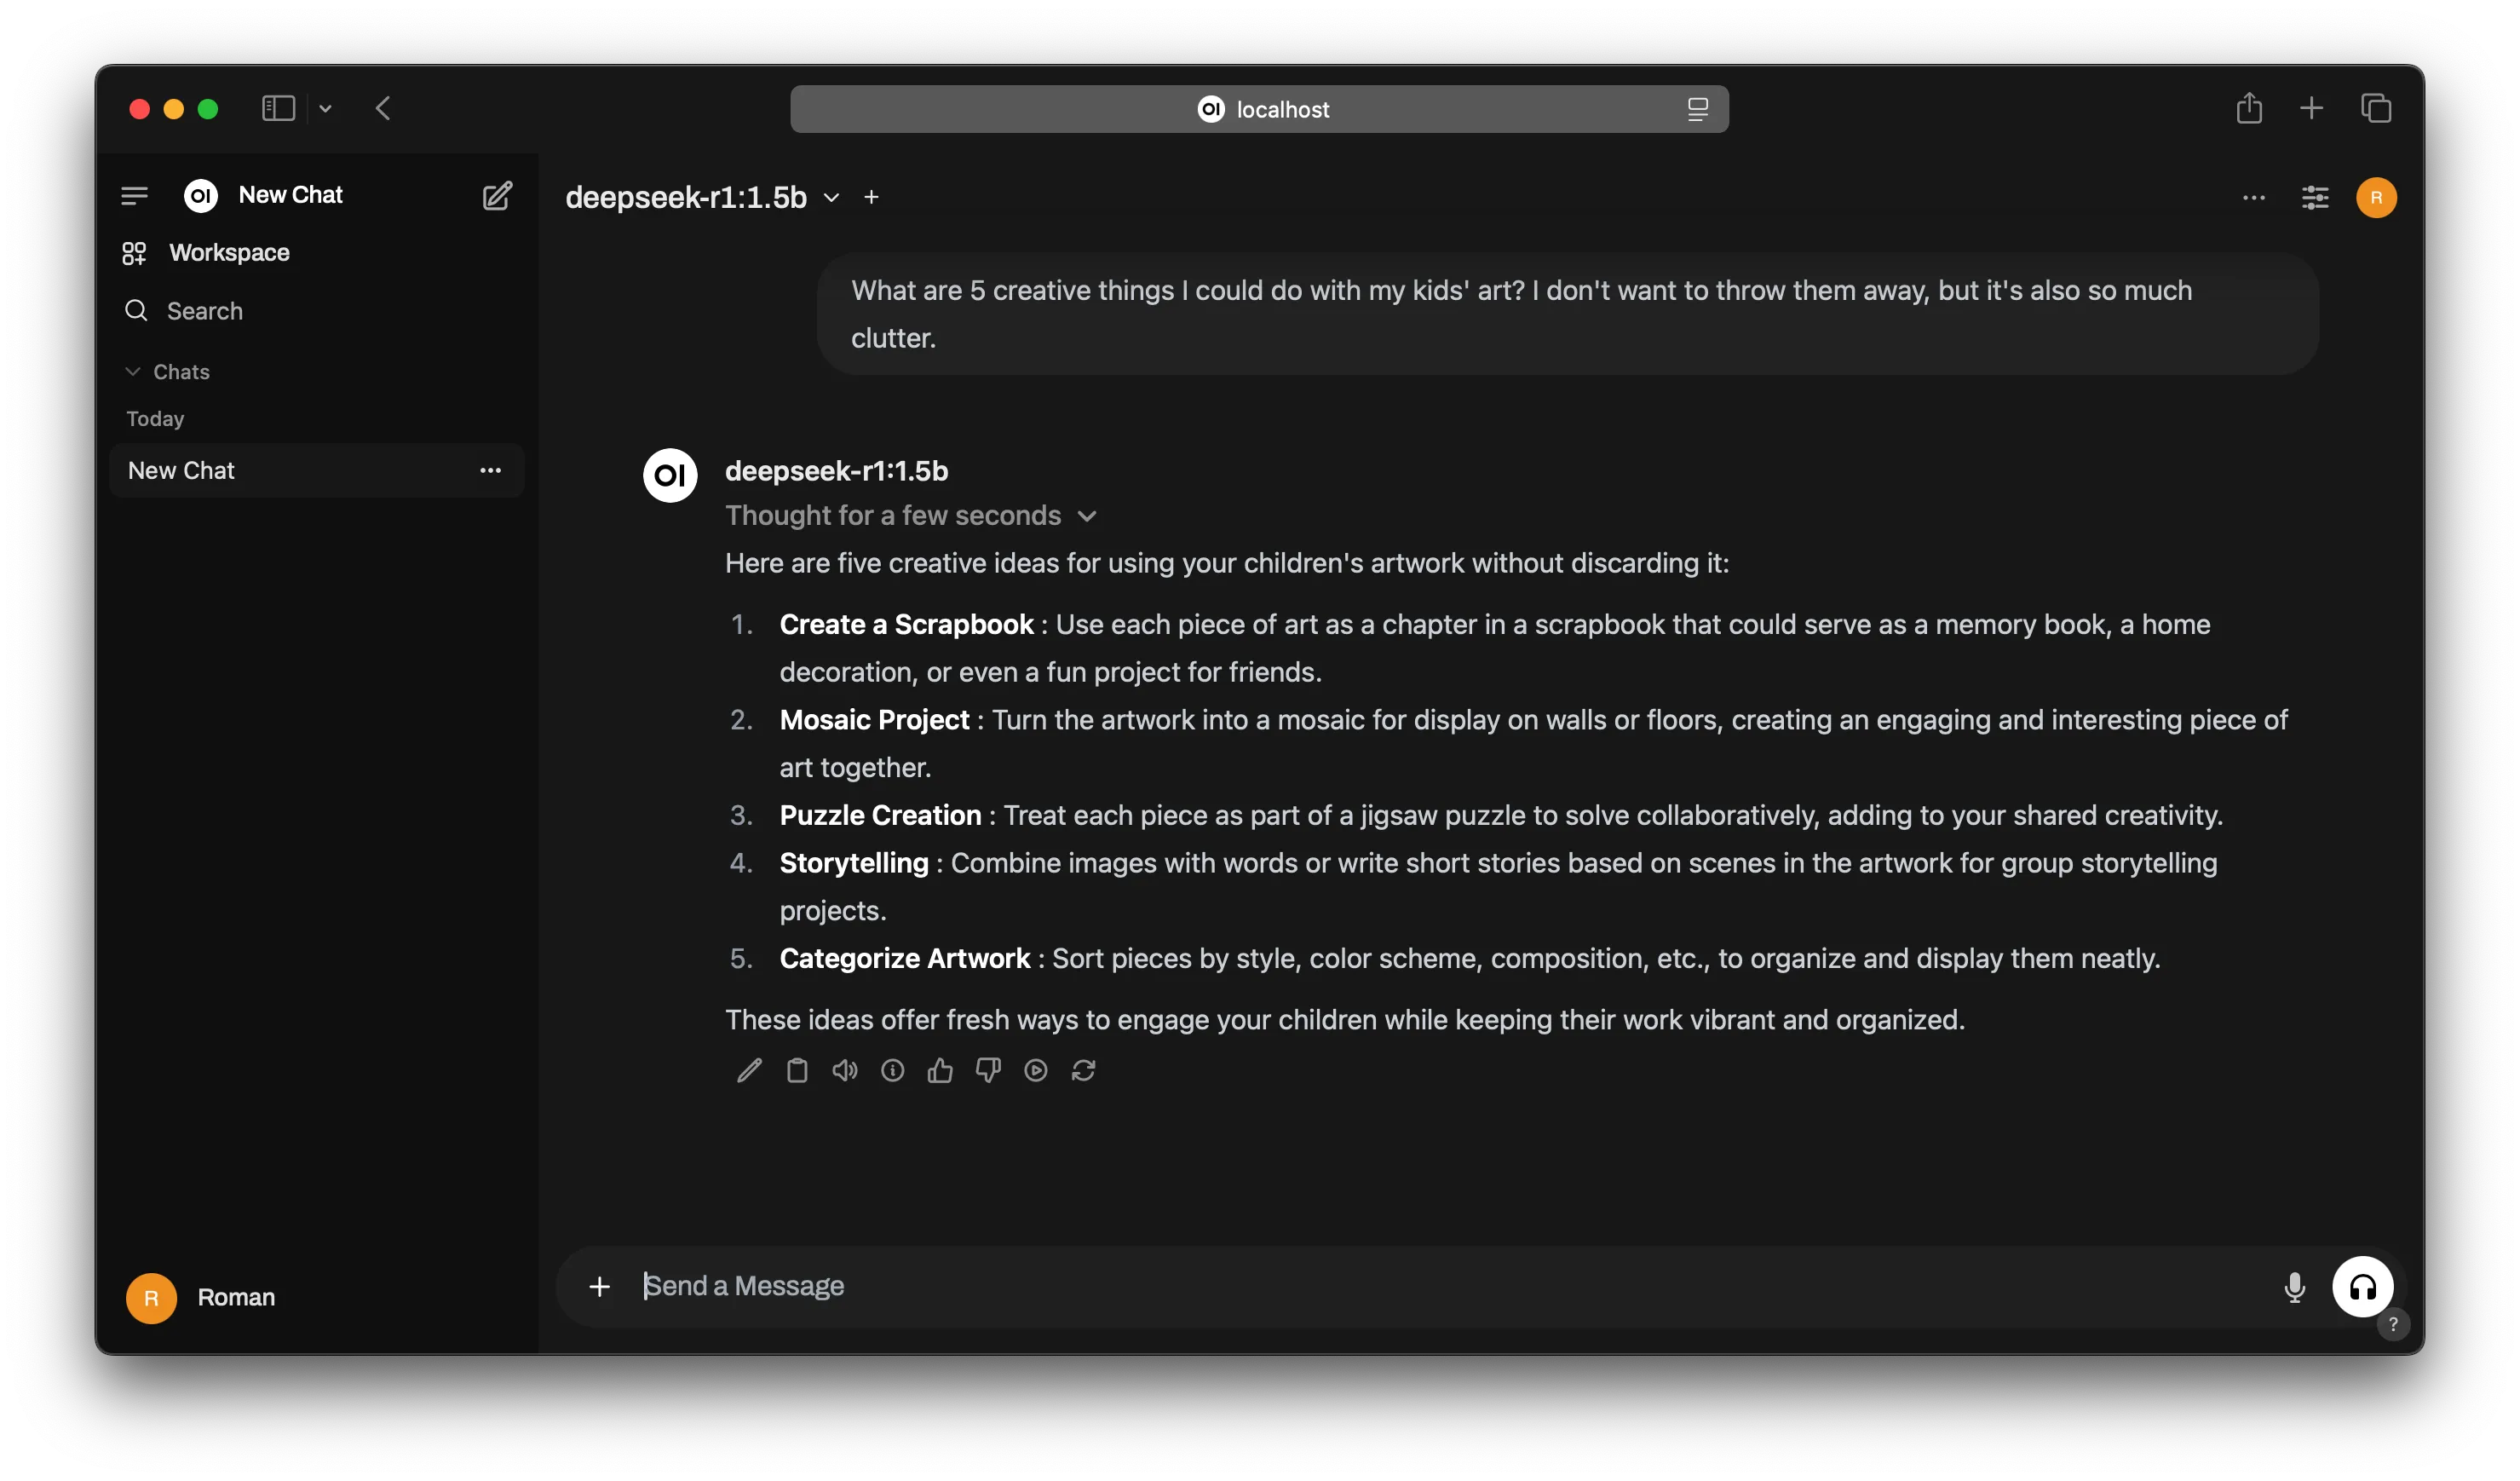
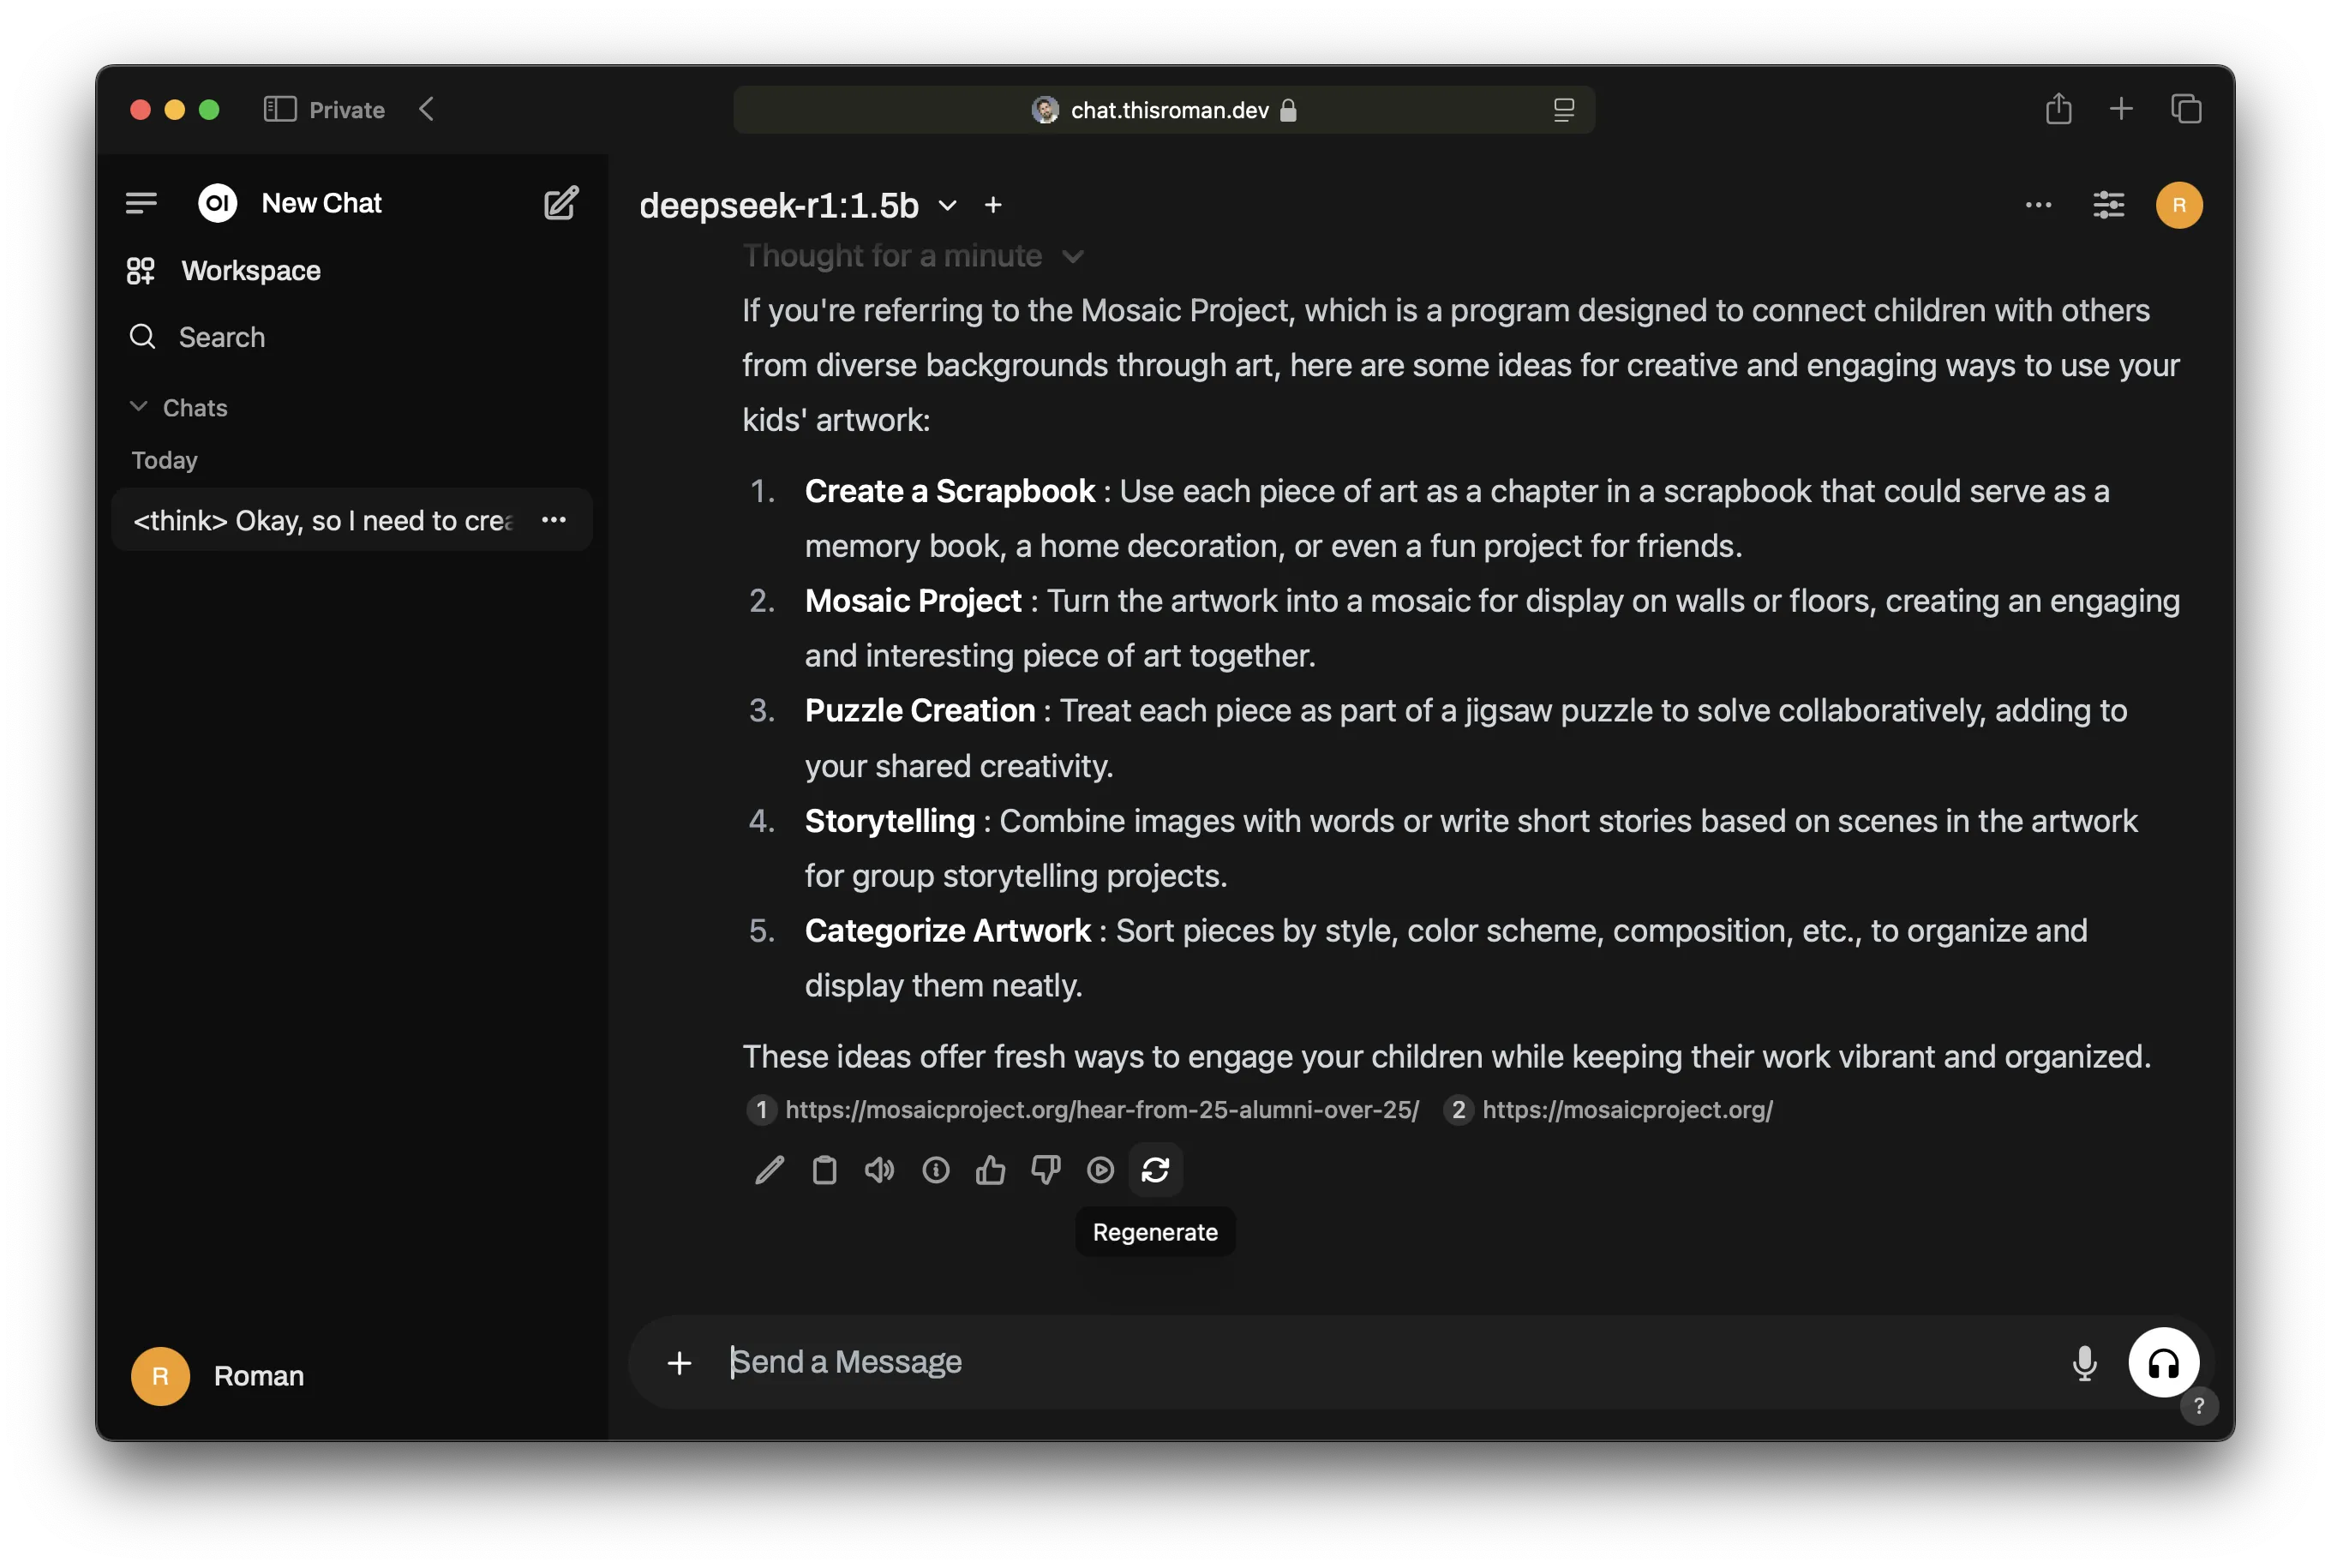
Try to open a new chat and see deepseek-r1:1.5b that means it works like a charm.
Type something or select from examples to see answer from AI-ed blue whale.
Ta-da, your own self-hosted chatgpt-like AI-ed consultant answered you!
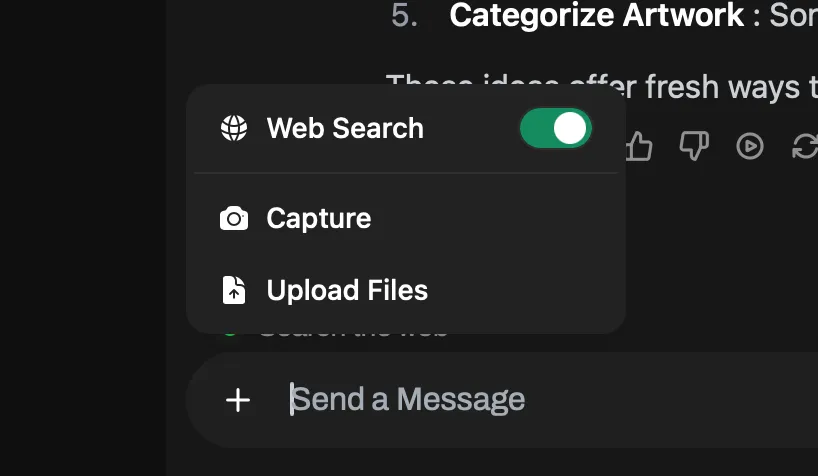
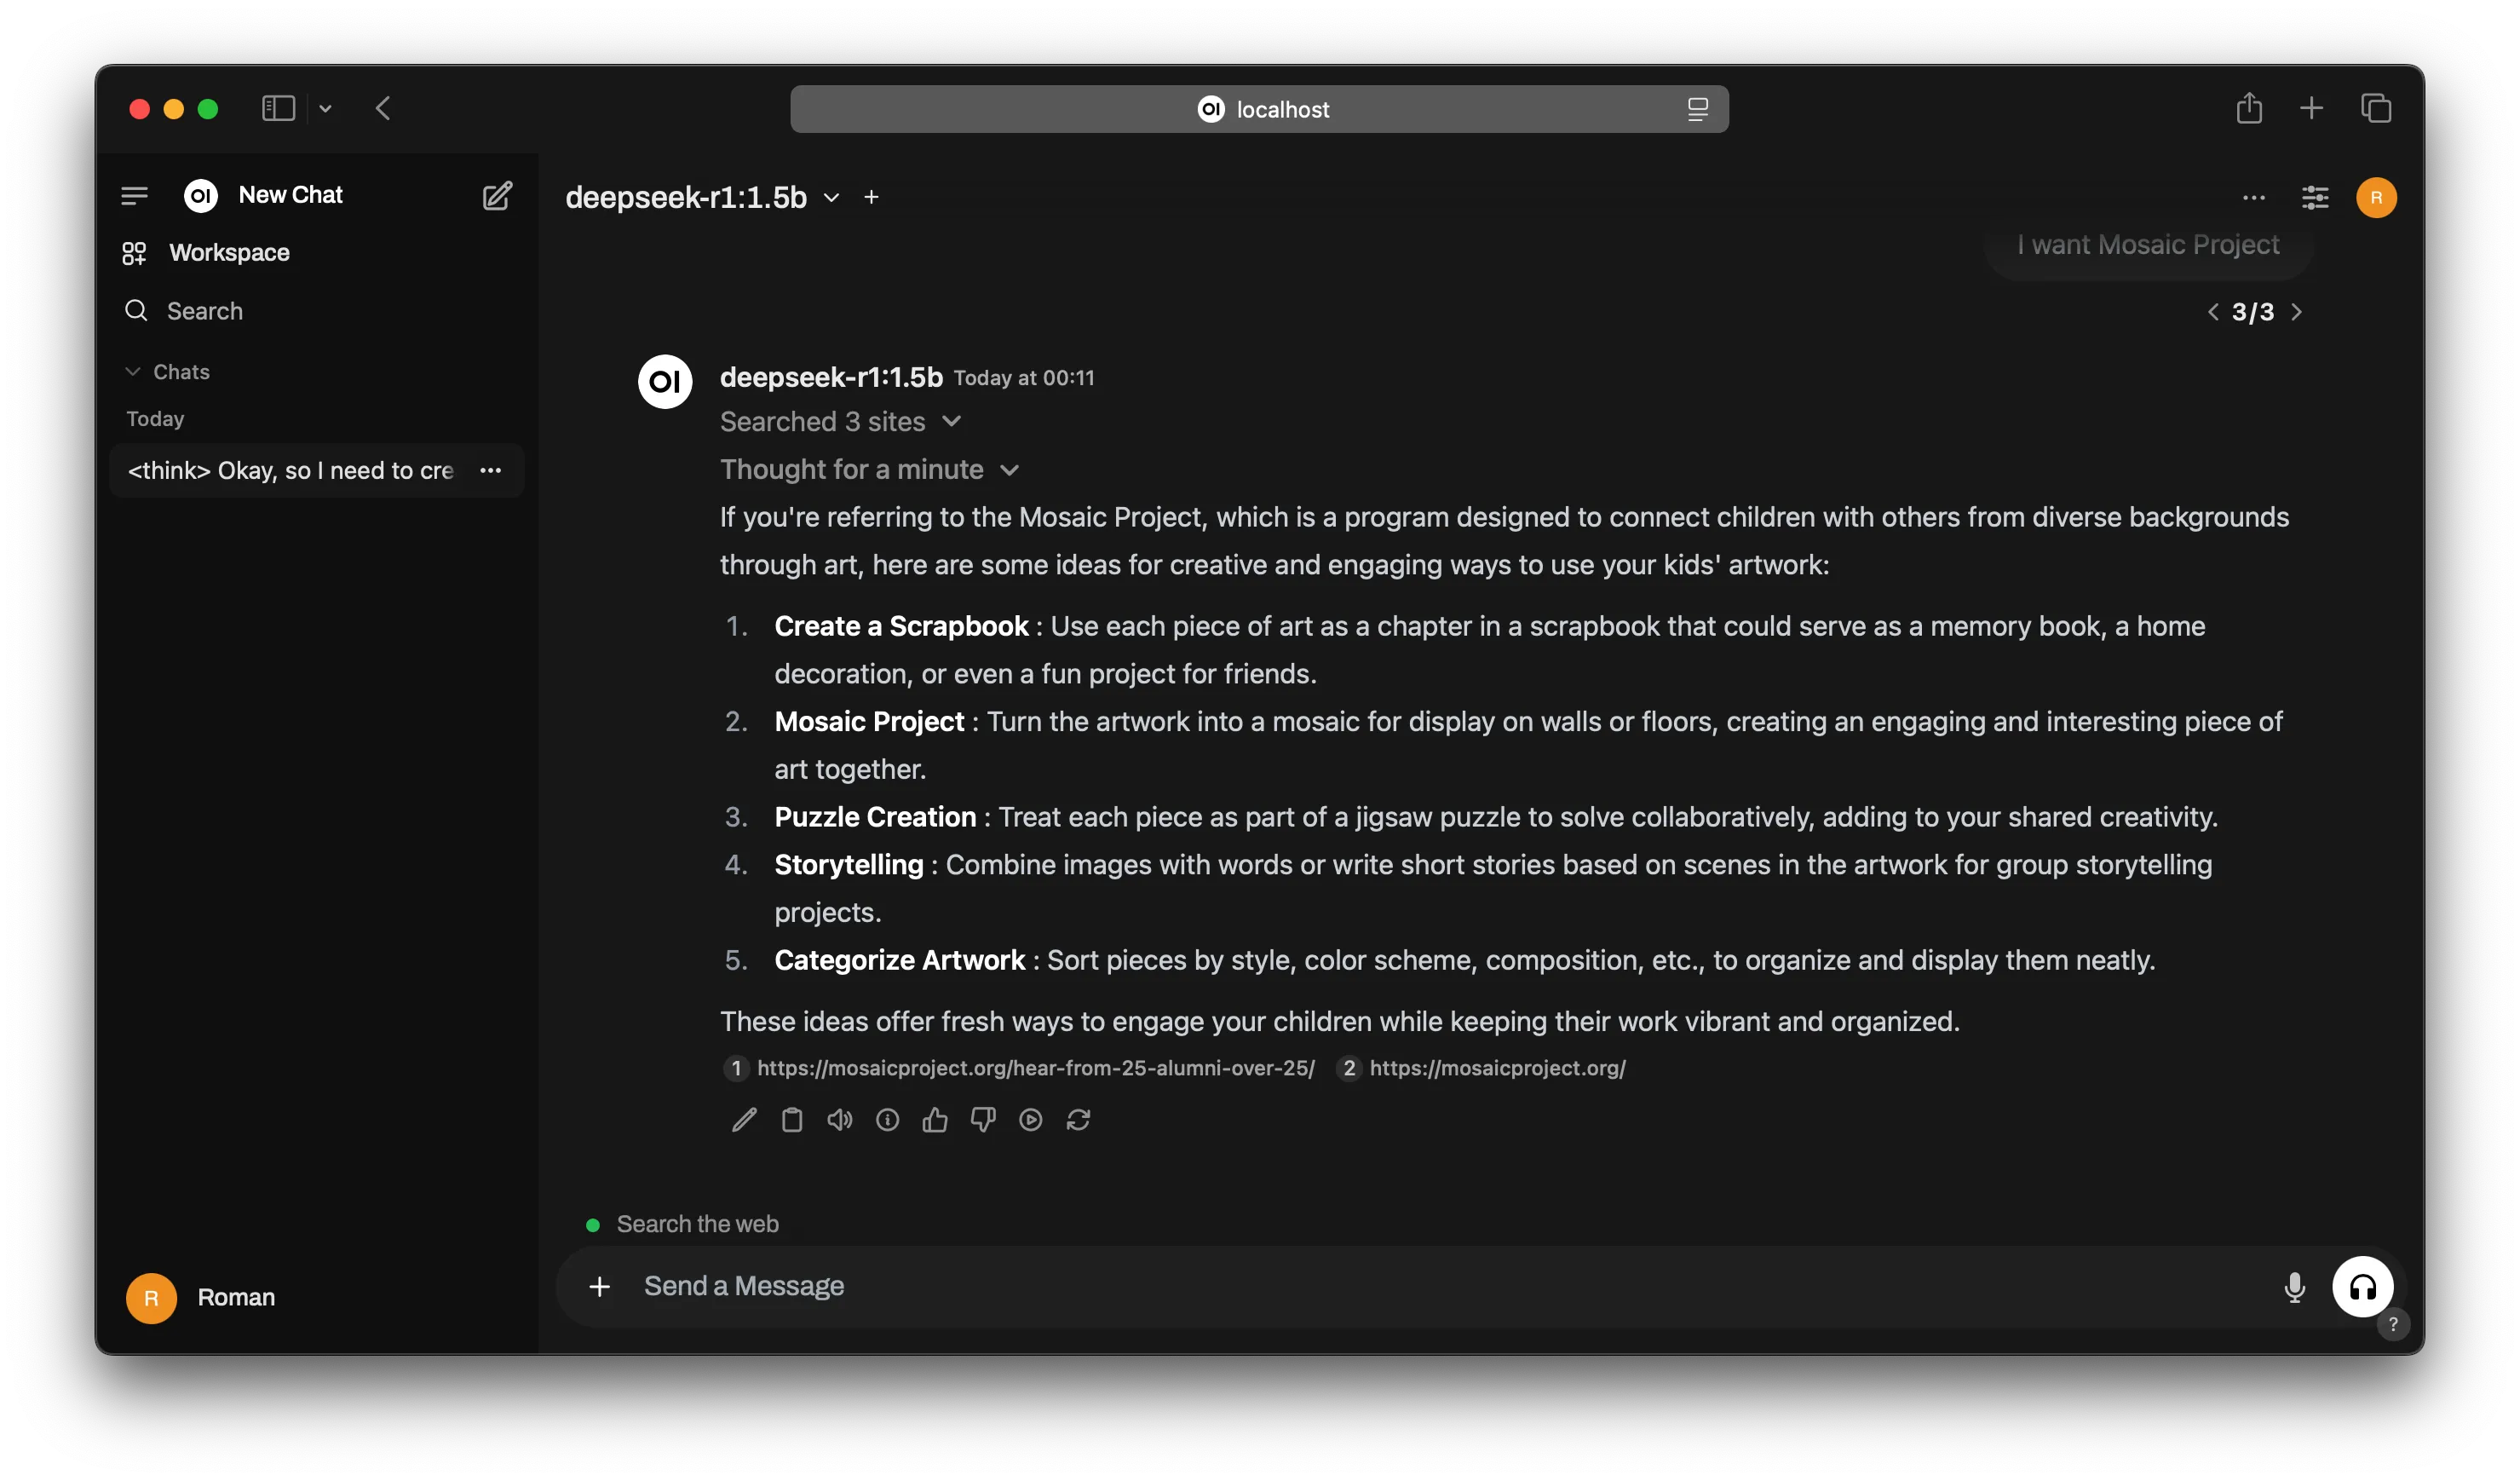
You can also utilize a web searching. Try to click on a plus icon and activate Web Search.
In theory, your request is addressed to the web and an answer incudes links to sources.
Cloudflared
And as I promised at he beginning, we’ll exposed UI to Web.
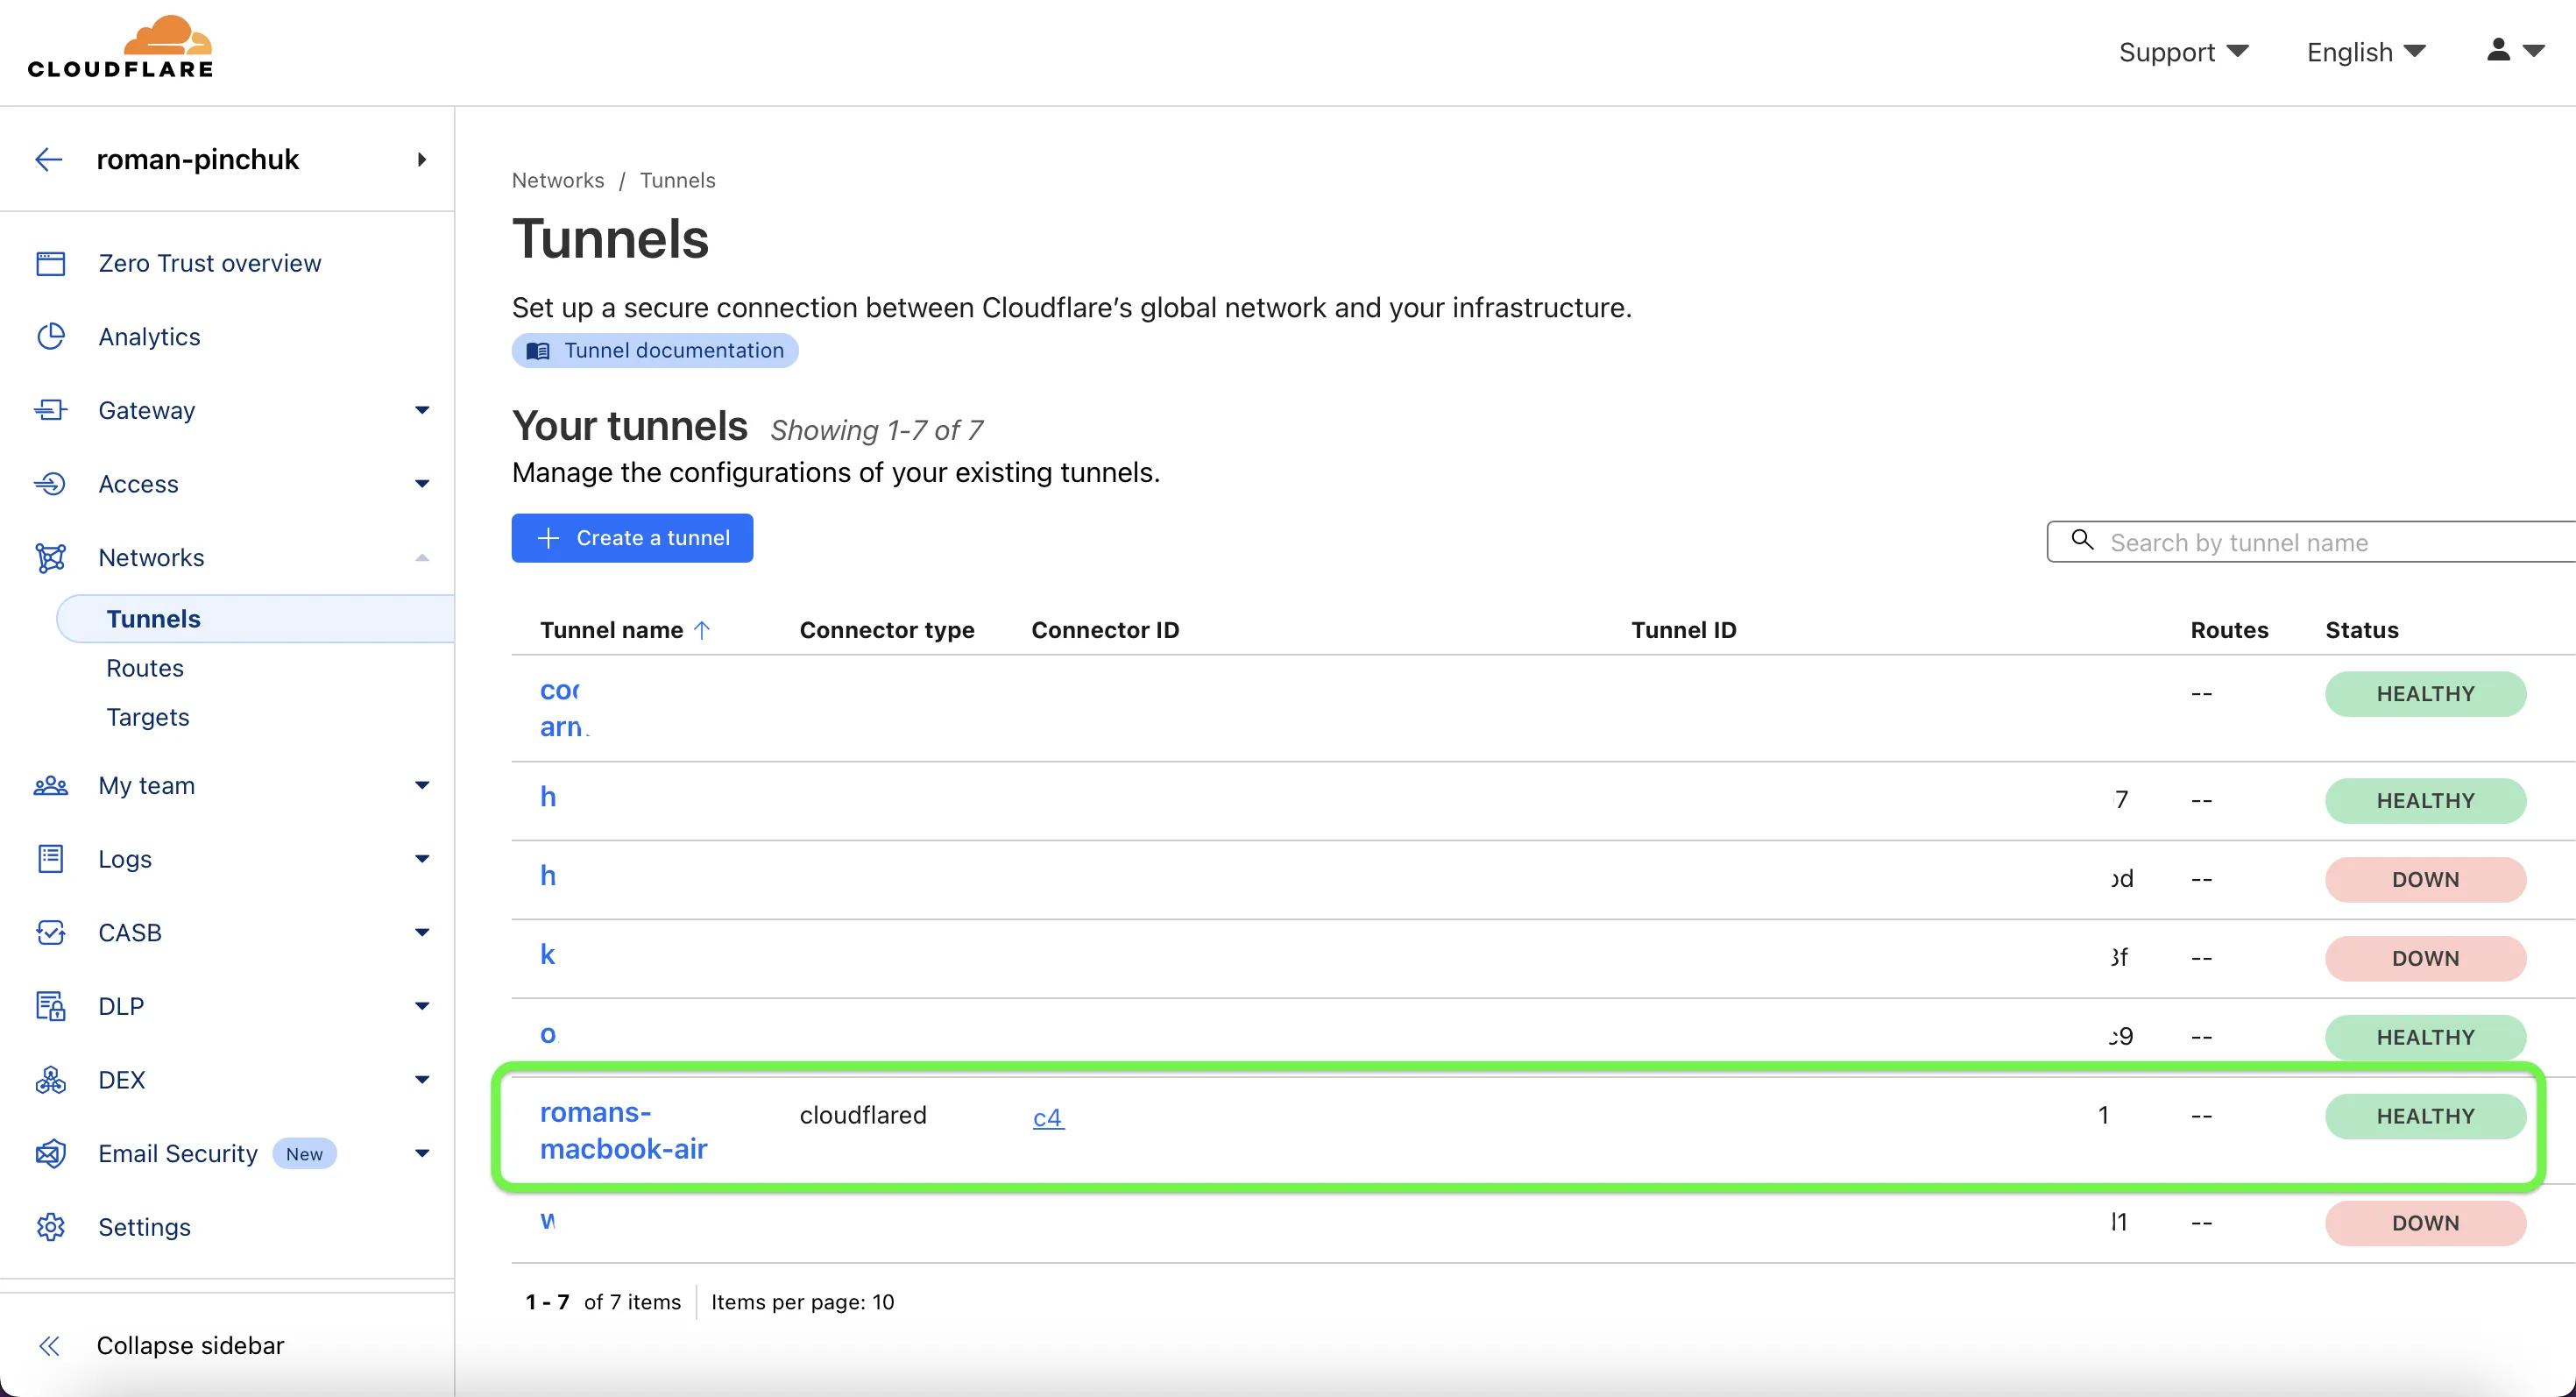
I use cloudflared dockerized service. We need to create a tunnel at Cloudflare Zero Trust Dashboard https://one.dash.cloudflare.com.
Networks → Tunnels → + Create a tunnel → Select Cloudflared → Name your tunnel → Select Docker option.
I recommend to modify the command that provided automatically by the following manner:
docker run -d--network host --name cloudflared cloudflare/cloudflared:latest tunnel run --token eyJhIjoiZjZlN2*************************
I added --network host to see every application at the host. If we leave without that option, the cloudflared doesn’t see because webui and ollama are in their network.
Alternatively, you can create some common network and attach it to every container (and it’ll be more securely than this example).
And I added --name cloudflared for more convenient naming because a randomized one by default.
And -d for detached mode.
After running the container, need to check if the tunnel is in online at the dashboard.
And a final step is Public Hostname adding. Click on the tunnel → Edit → Public Hostname → + Add a public hostname → Select a Domain (required) → Type some subdomain if your main domain is occupied (in my case it is chat) → Service/Type HTTP → URL localhost:3000
After that, try to open chat.your.domain and see the same Open WebUI from your local host.
Thank you for your reading and stay tuned 🫡
]]>Roman Pinchukhi@thisroman.devhttps://thisroman.devProcess vs Thread in Python2024-12-15T00:00:00+00:002024-12-15T00:00:00+00:00https://thisroman.dev/2024/12/15/process-vs-thread-in-python
Hi there,
I posted some time ago, and now I’m continuing because it helps keep important things organized and makes it easier to review and remember information.
I want to dive into the topic of processes and threads in Python because an HR representative asked me about it, and I wasn’t prepared to answer…
What’s differences between thread and process in Python?
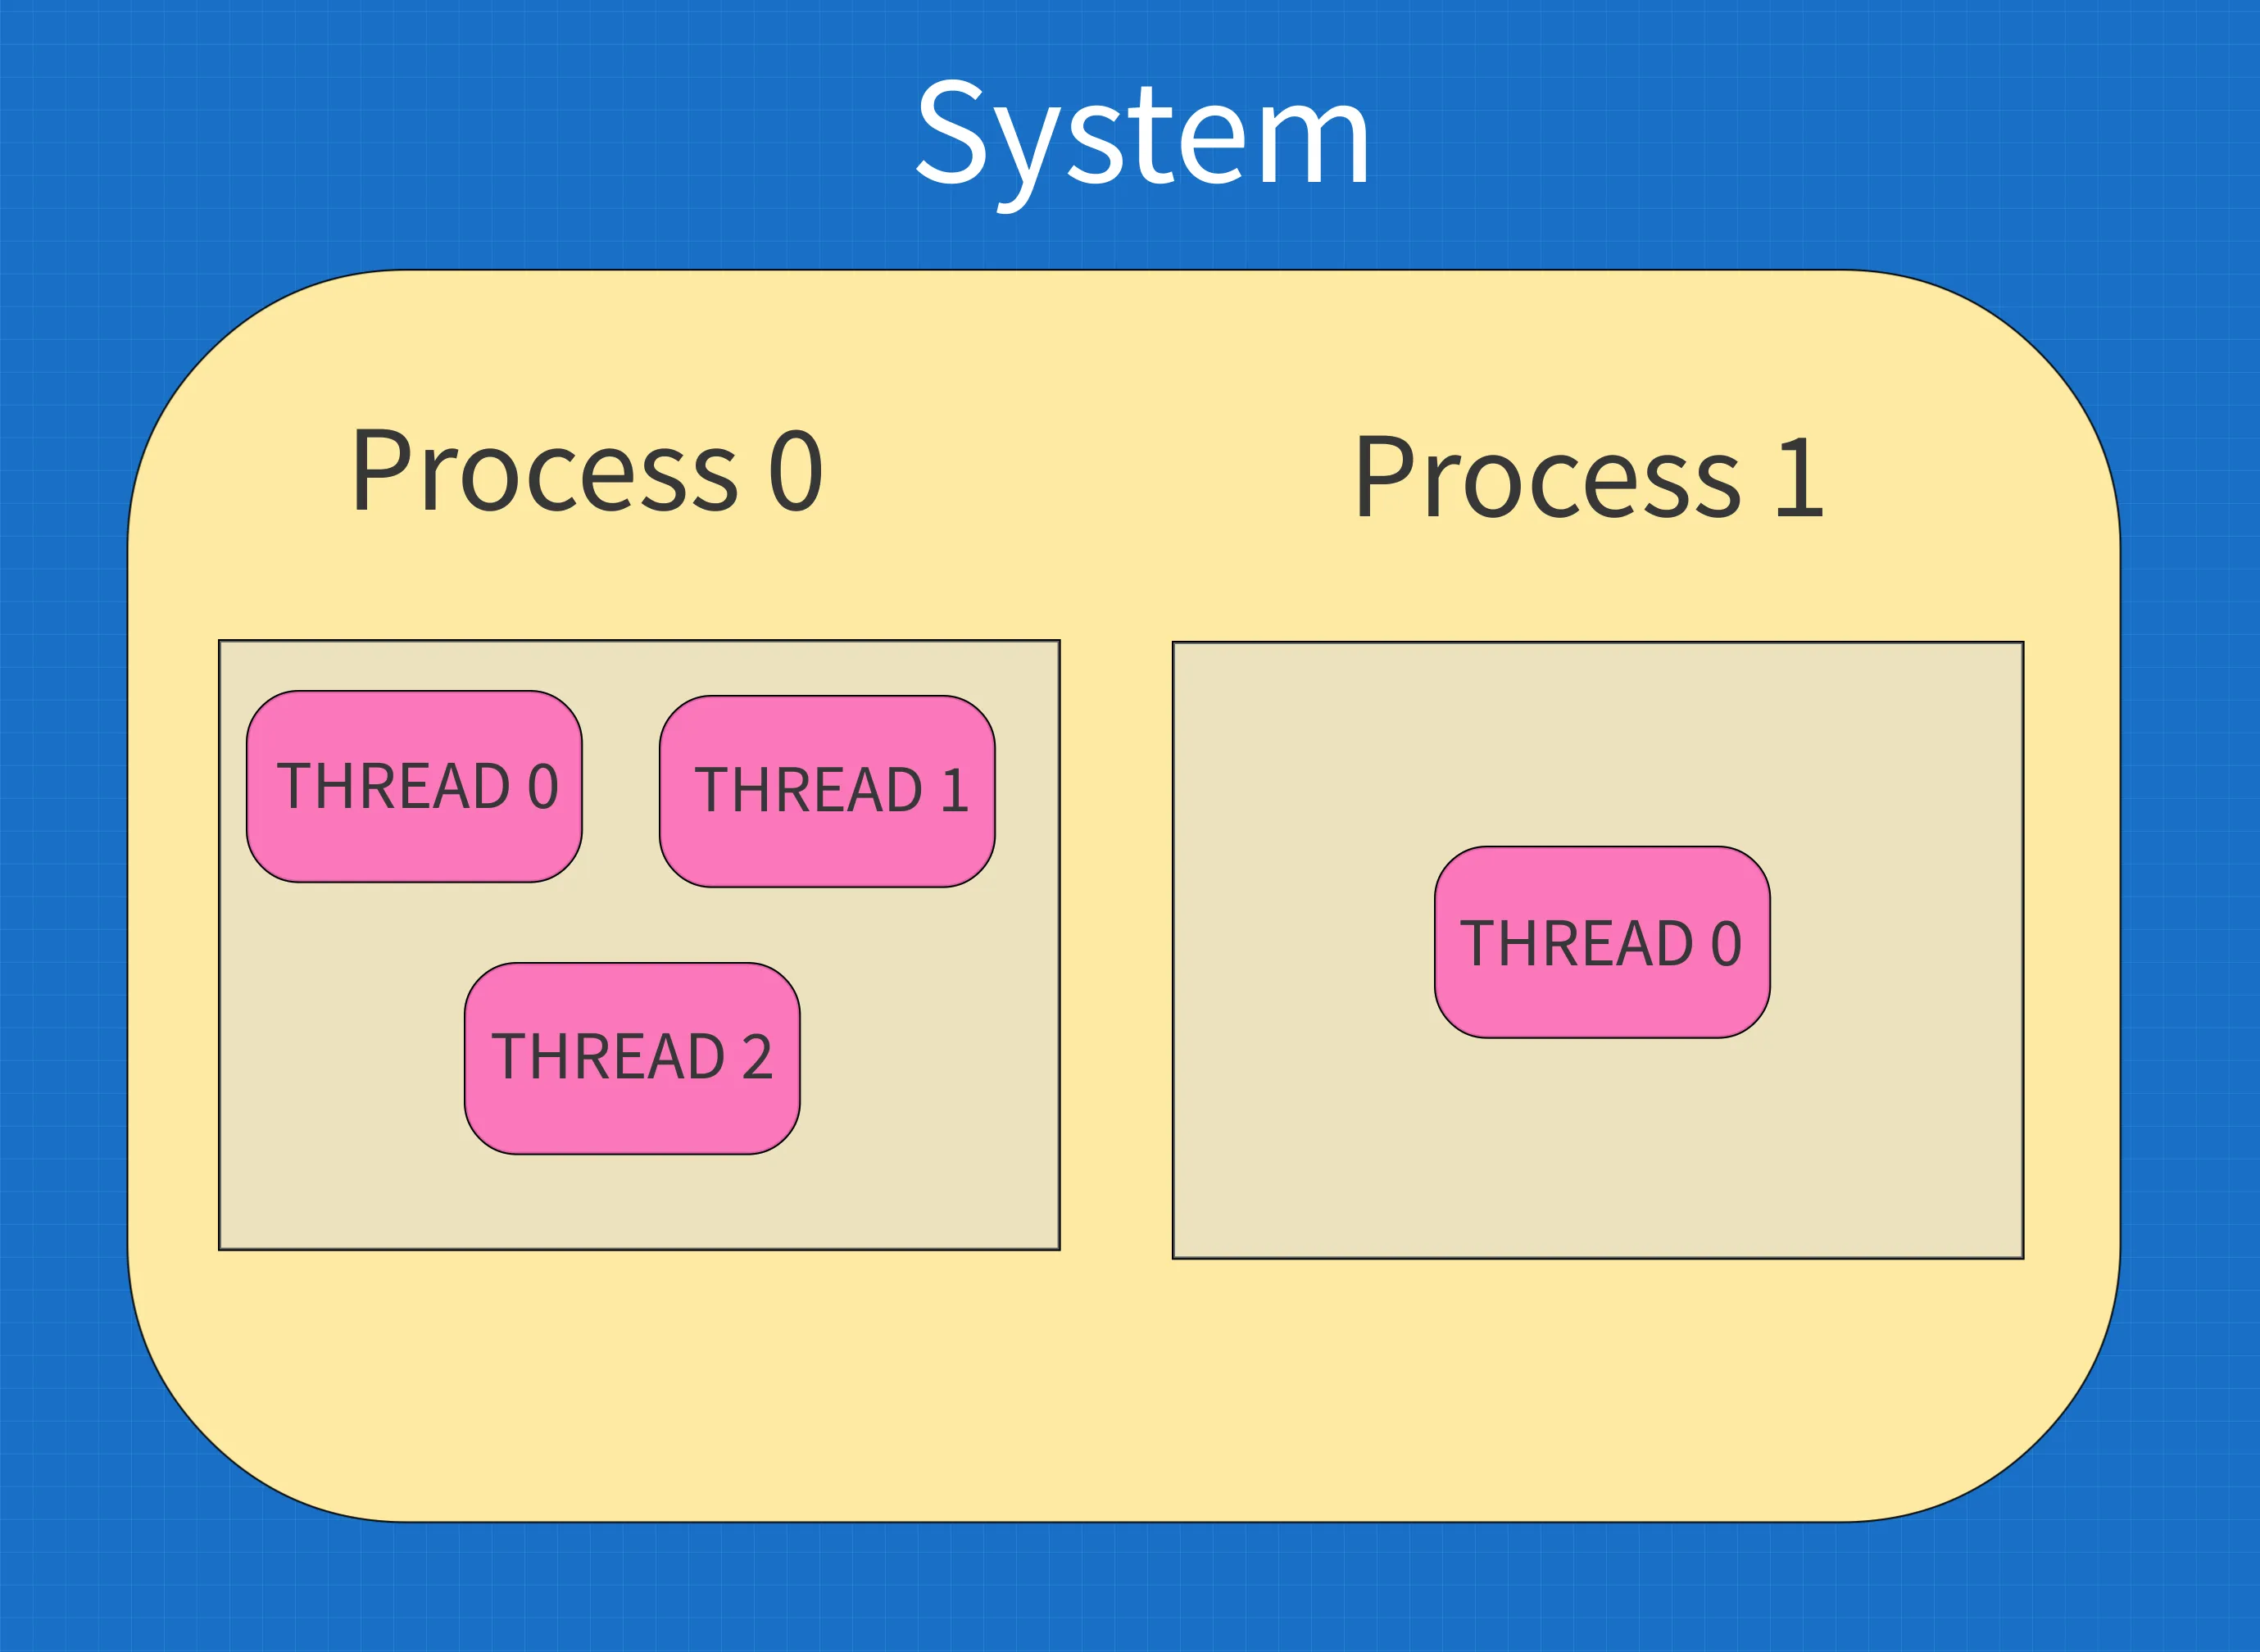
Definition
Process: A process is an independent execution unit that contains its own memory space. Each Python program runs in its own process, and processes are managed by the operating system.
Thread: A thread is a smaller unit of execution that runs within the context of a process. All threads within a process share the same memory space.
Memory
Process: Processes do not share memory by default. Each process has its own memory space, and inter-process communication (IPC) is required to exchange data between processes (e.g., using pipes, sockets, or shared memory).
Thread: Threads within the same process share the same memory space, which makes communication between threads easier but increases the risk of race conditions and other synchronization issues.
Concurrency
Process: Python’s multiprocessing module can create multiple processes, bypassing the Global Interpreter Lock (GIL), allowing true parallel execution of Python code on multi-core CPUs.
Thread: Python’s threading module creates threads within a single process. However, due to the GIL, only one thread executes Python bytecode at a time in CPython. Threads are better suited for I/O-bound tasks rather than CPU-bound tasks.
Performance
Process: Suitable for CPU-bound tasks because processes can run on multiple CPU cores in parallel, effectively bypassing the GIL.
Thread: Suitable for I/O-bound tasks, such as reading/writing files, network requests, or database queries, since threads can efficiently wait for I/O operations to complete.
Overheads
Process: Processes have higher overhead because creating a process involves duplicating the memory space and context.
Thread: Threads have lower overhead because they share the memory space of the process.
Crash Isolation
Process: A crash in one process does not affect other processes.
Thread: A crash in one thread can bring down the entire process.
Thread:
Tasks that benefit from shared memory and faster communication within a process.
I/O-bound tasks (e.g., web scraping, handling web requests).
Summary Table
Feature
Process
Thread
Memory
Separate memory space
Shared memory space
GIL Constraint
No
Yes (in CPython)
Overhead
High
Low
Communication
Via IPC mechanisms
Shared memory
Crash Isolation
Isolated
Shared
Best for
CPU-bound tasks
I/O-bound tasks
]]>Roman Pinchukhi@thisroman.devhttps://thisroman.devHave your own GitHub-like service!2023-05-29T00:00:00+00:002023-05-29T00:00:00+00:00https://thisroman.dev/2023/05/29/gitea-selfhosted-github
Today I’ll show how to deploy your own Cloud Git Repository Service. This article is from Self-Hosted Services series which perfect fits for your home lab :)
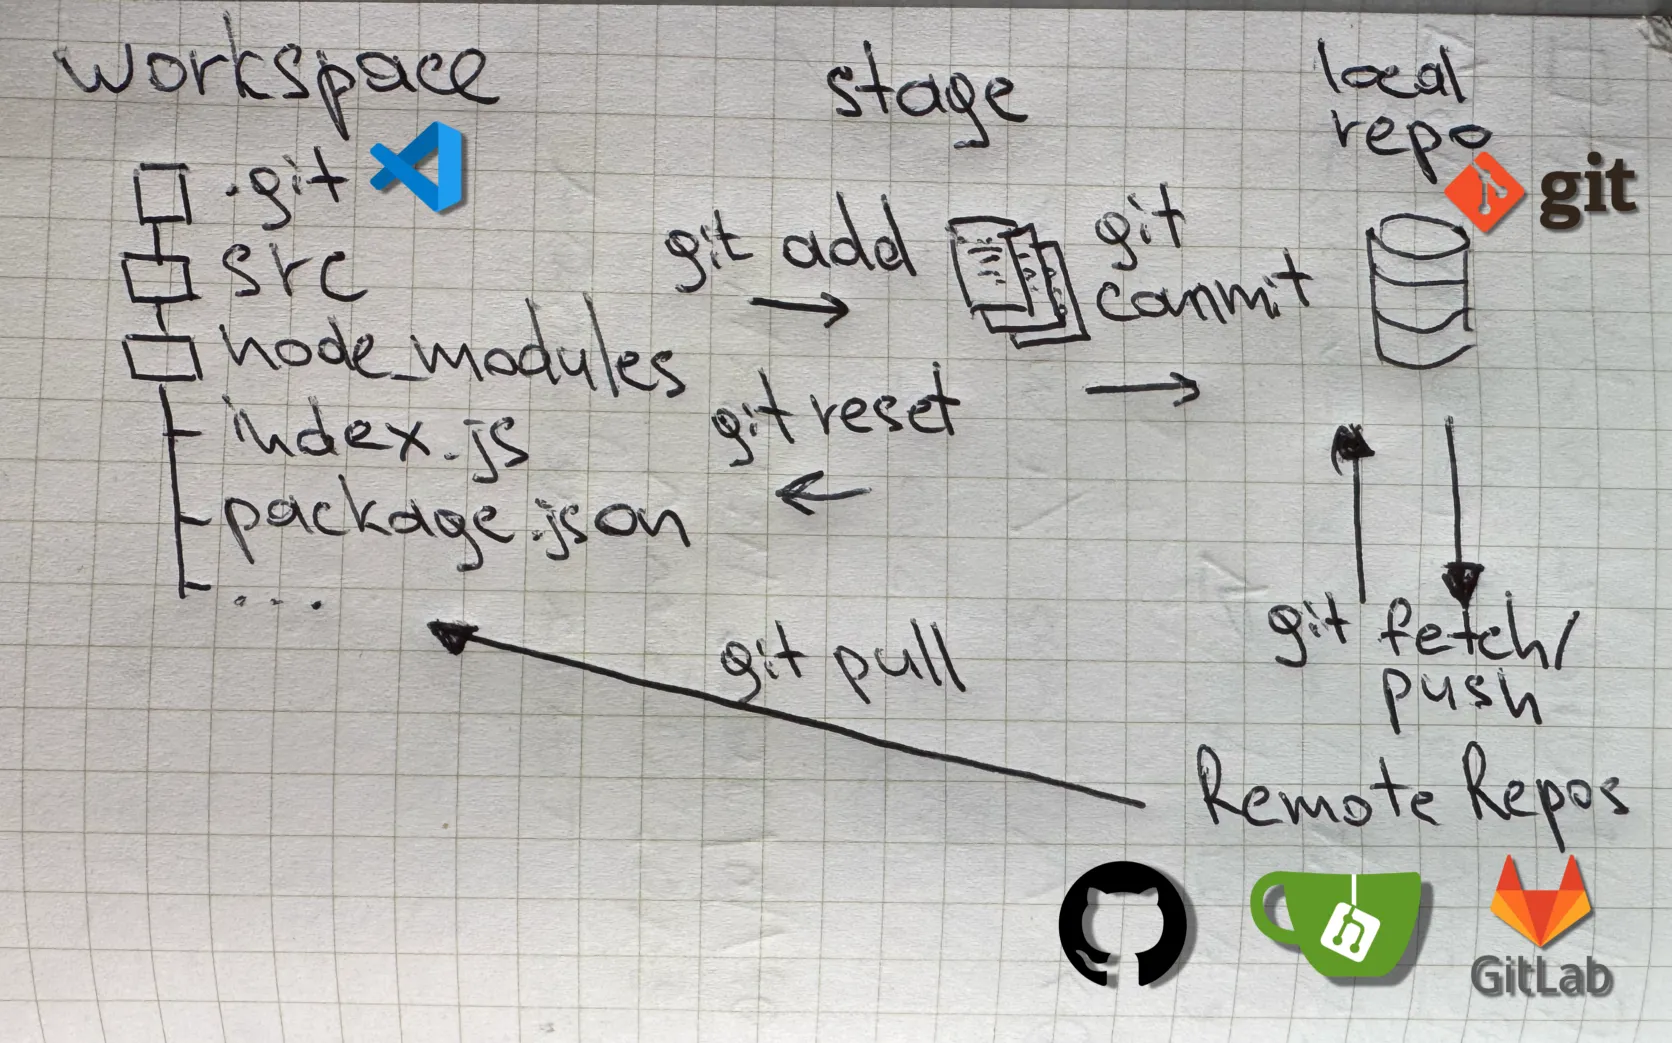
When you’re working on software development, it’s important to manage your source code efficiently and keep track of changes. Source code management (SCM) systems are tools that help you do this. They provide a way for you and your team to work together on projects of any size, no matter how many people are involved. There have been different SCM software options over the years, like CVS, SubVersion, Perforce, and Mercurial. But the most popular one now is Git, which is used with sites like GitHub, Bitbucket and GitLab.
The problem is that free accounts on these sites are mostly for open-source projects. If you want to work on private or proprietary software, there can be costs involved. Plus, you have to rely on an external organization for access to your code, which may not be ideal.
To solve these issues, there are self-hosted solutions you can use, like Gogs, Gitea, and GitLab. In this tutorial, we’ll focus on setting up Gitea, which is one of the more popular options. It allows you to host private repositories and manage your own projects from start to finish. Gitea is easy to deploy because it’s small, self-contained, and doesn’t need a lot of hardware. We’ll be using a Docker installation of Gitea, which helps keep the software up to date.
Prerequisites:
VDS (Hosting) or your local machine with outgoing access (Static Public IP required)
Docker CE (with Docker Compose Plugin) on target server machine
Domain Name (Optional)
Prepare Server OS:
Gitea, similar to other source code repositories, utilizes SSH for remote repository access. This feature enables users to have control over their code by managing their SSH keys directly within Gitea. However, to enable users to access the host machine via SSH, it is necessary to create a git user on the host. This initial step is essential as it allows you to obtain the user and group ID required for accessing the user’s account.
First of all, need to create the user on the host:
version:'3'networks:gitea:external:falseservices:server:# Specify here which image should be usedimage:gitea/gitea:latestcontainer_name:giteaenvironment:-USER_GID=[GID value from Prepare Server OS]-USER_UID=[UID value from Prepare Server OS]restart:alwaysnetworks:-giteavolumes:-./gitea:/data-/home/git/.ssh/:/data/git/.ssh-/etc/timezone:/etc/timezone:ro-/etc/localtime:/etc/localtime:roports:-'127.0.0.1:3000:3000'-'127.0.0.1:2222:22'
Save the config by :wq
Afterwards in terminal type the following command:
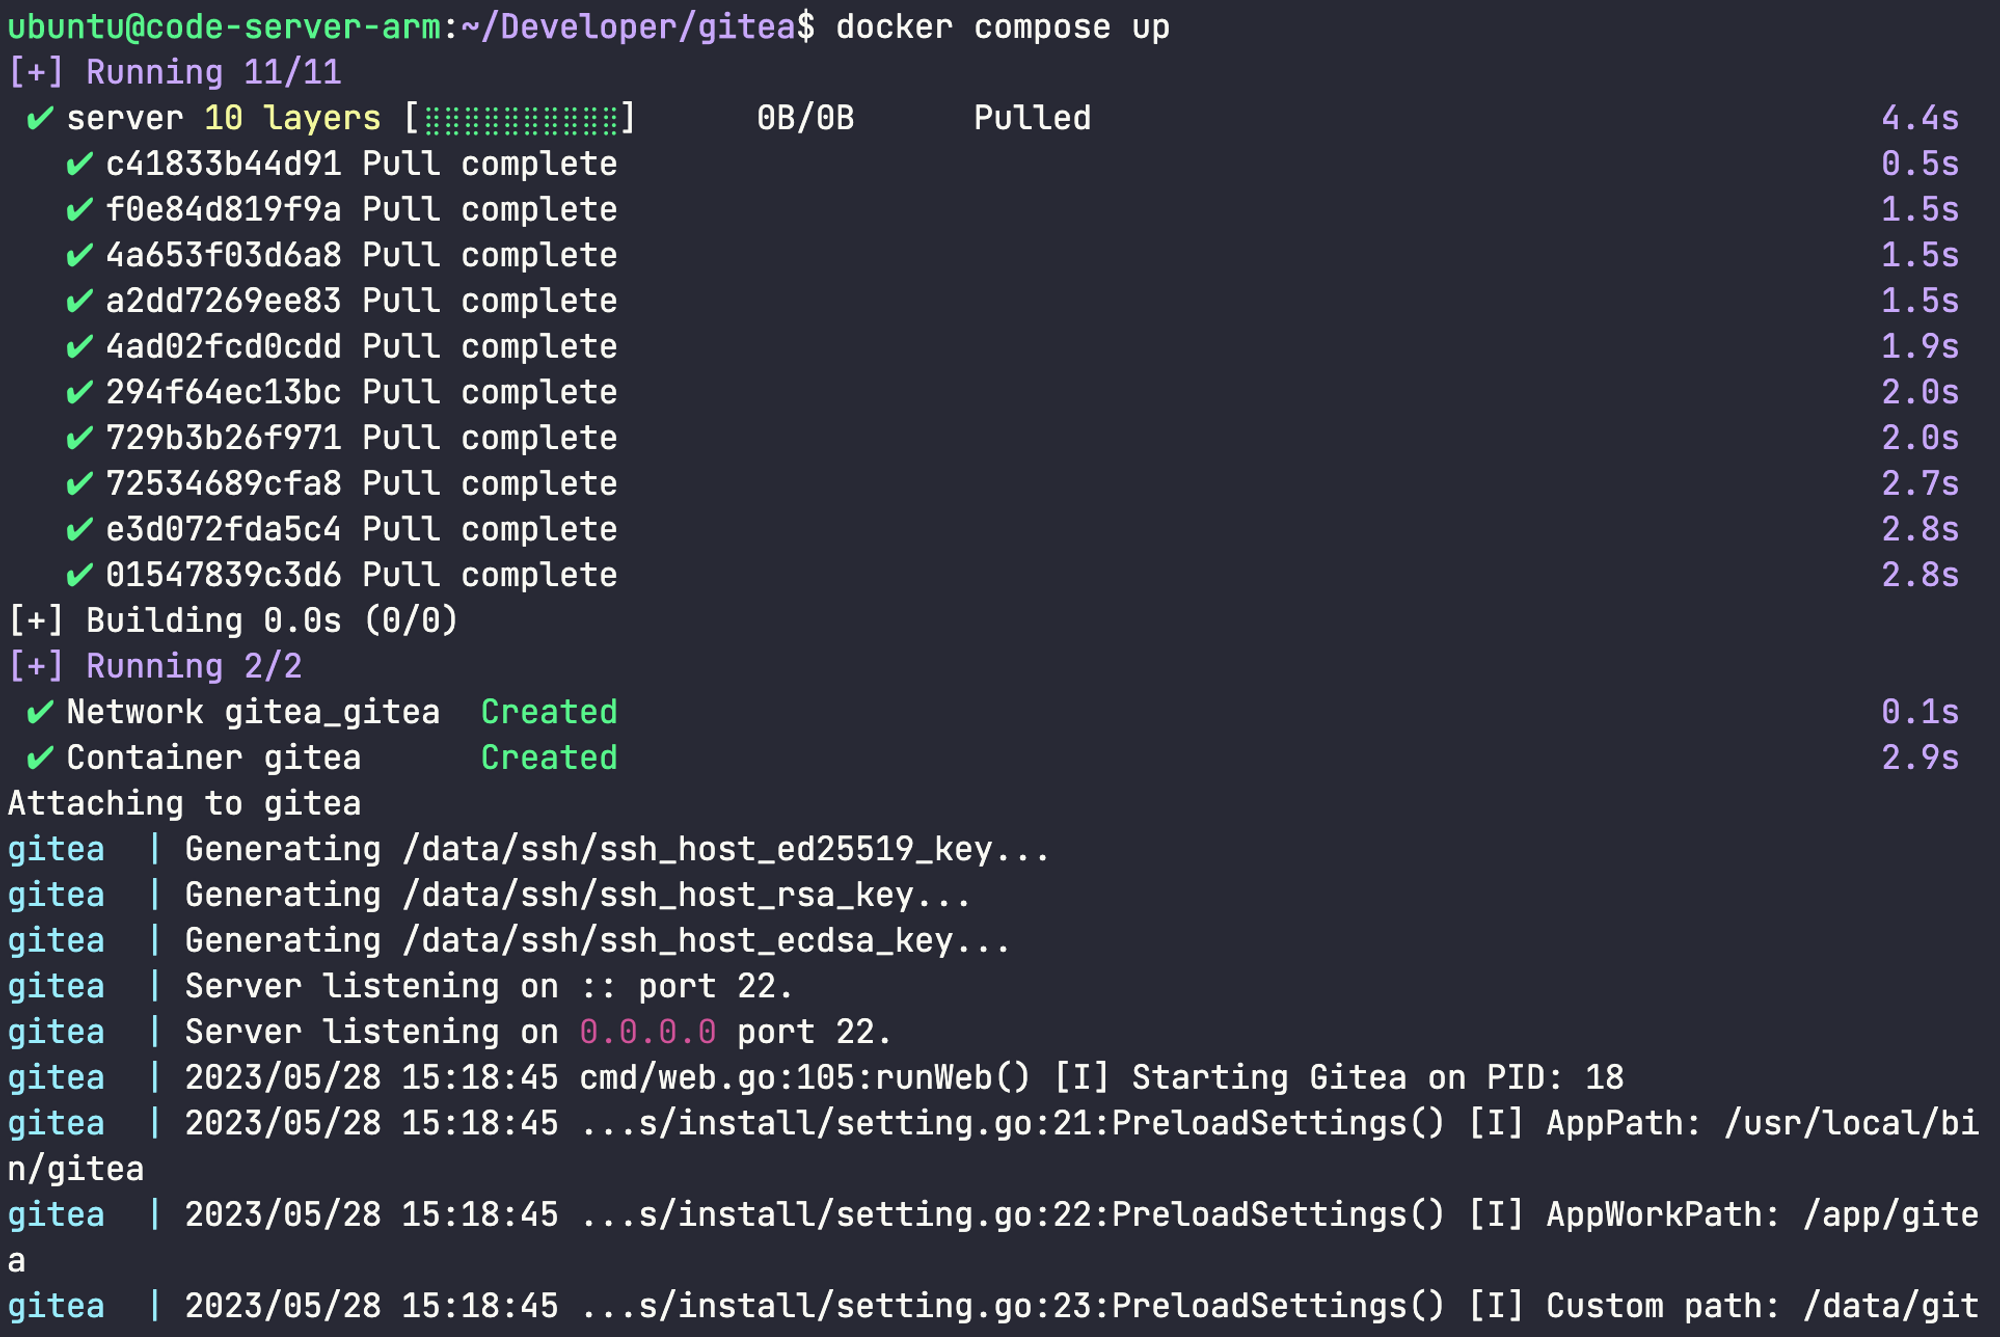
docker-composeup
Output looks like that:
In order to run container as detached you should use the following command instead previous:
Usually, I check availability of a fresh one running service by curl like this:
ubuntu@code-server-arm:~$curllocalhost:3000<!DOCTYPEhtml><htmllang="en-US"class="theme-auto"><head><metacharset="utf-8"><metaname="viewport"content="width=device-width, initial-scale=1"><title>Gitea:thisroman.dev</title><linkrel="manifest"href="data:application/json;base64,eyJuYW1lIjoiR2l0ZWE6IHRoaXNyb21hbi5kZXYiLCJzaG9ydF9uYW1lIjoiR2l0ZWE6IHRoaXNyb21hbi5kZXYiLCJzdGFydF91cmwiOiJodHRwczovL2dpdC50aGlzcm9tYW4uZGV2LyIsImljb25zIjpbeyJzcmMiOiJodHRwczovL2dpdC50aGlzcm9tYW4uZGV2L2Fzc2V0cy9pbWcvbG9nby5wbmciLCJ0eXBlIjoiaW1hZ2UvcG5nIiwic2l6ZXMiOiI1MTJ4NTEyIn0seyJzcmMiOiJodHRwczovL2dpdC50aGlzcm9tYW4uZGV2L2Fzc2V0cy9pbWcvbG9nby5zdmciLCJ0eXBlIjoiaW1hZ2Uvc3ZnK3htbCIsInNpemVzIjoiNTEyeDUxMiJ9XX0="><metaname="default-theme"content="auto"><metaname="author"content="Gitea - Git with a cup of tea"><metaname="description"content="Gitea (Git with a cup of tea) is a painless self-hosted Git service written in Go"><metaname="keywords"content="go,git,self-hosted,gitea"><metaname="referrer"content="no-referrer"><linkrel="icon"href="/assets/img/favicon.svg"type="image/svg+xml"><linkrel="alternate icon"href="/assets/img/favicon.png"type="image/png"><linkrel="stylesheet"href="/assets/css/index.css?v=1.19.3"><script>window.addEventListener('error',function(e){window._globalHandlerErrors=window._globalHandlerErrors||[];window._globalHandlerErrors.push(e);});window.config={appUrl:'https:\/\/git.thisroman.dev\/',appSubUrl:'',
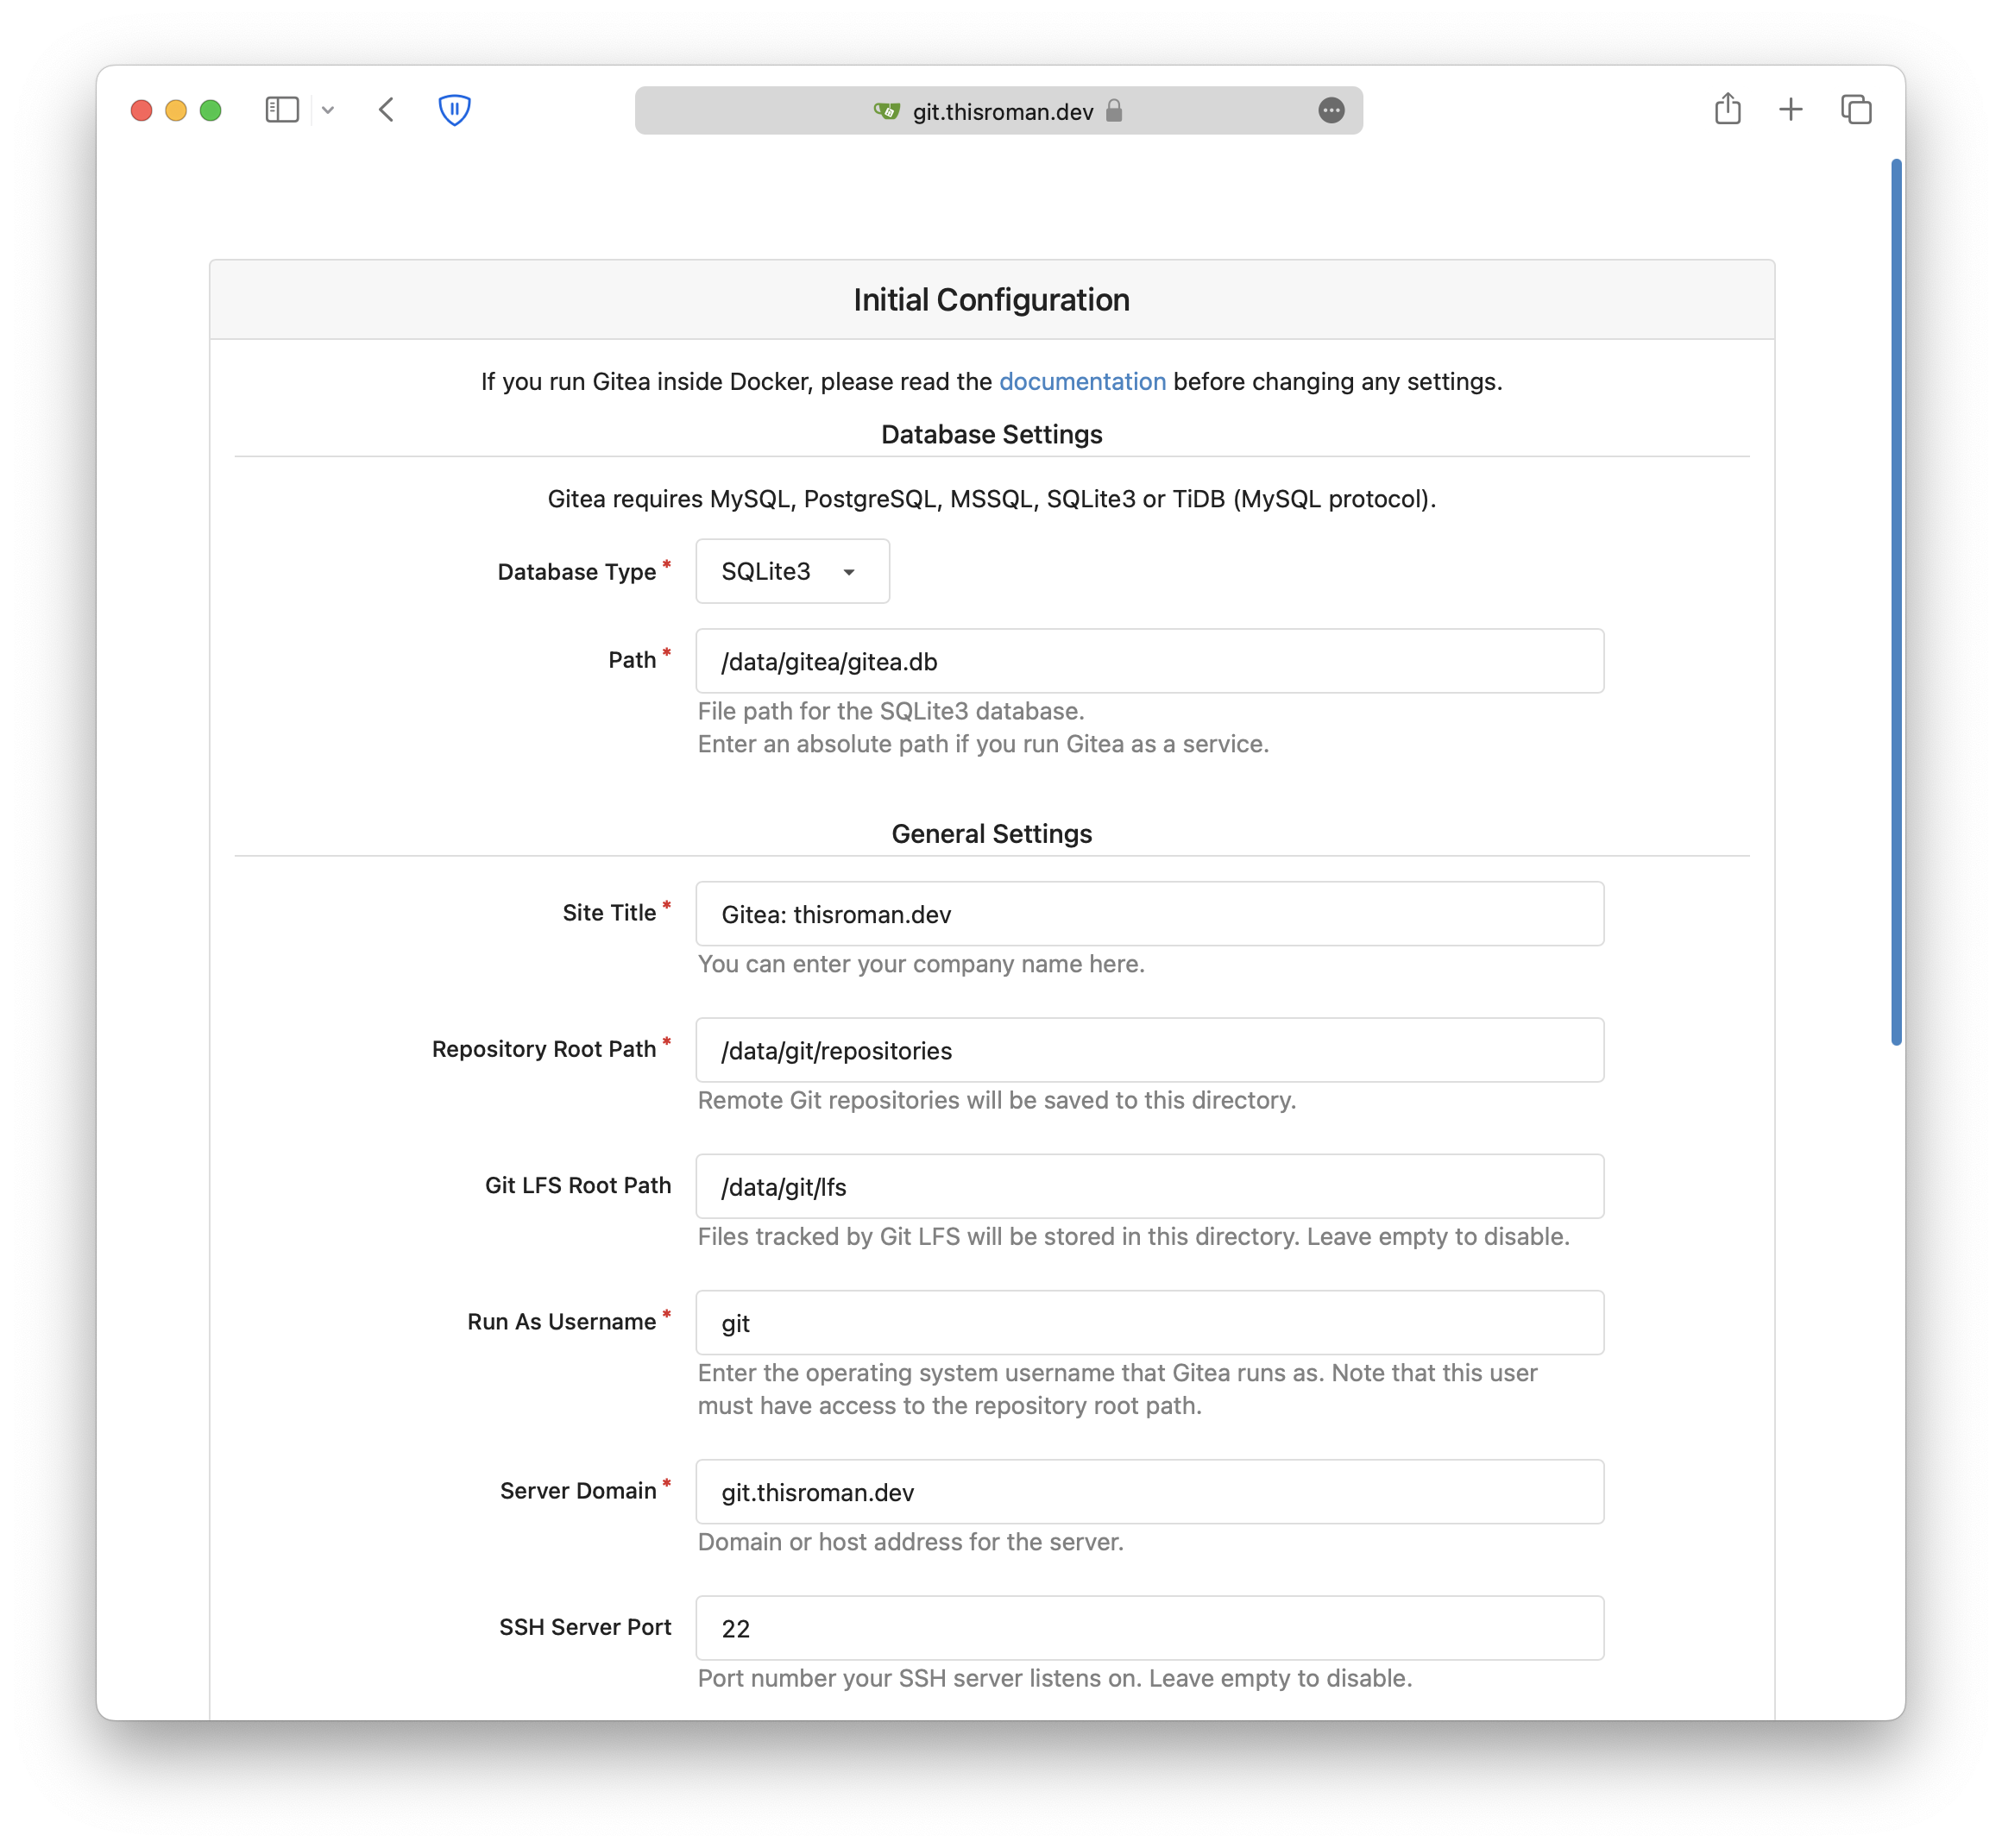
Navigate to http(s)://YOUR_DOMAIN OR STATIC_PUBLIC_IP (OR localhost:3000).
Here it is!
After that, have to setting your Reverse Proxy Service (I’ll post about that soon and attach link) and you’ll see a first configuration page like that:
Certain settings, such as the site title, can be customized according to your specific needs. However, for the purpose of this tutorial, you will need to modify the following:
Server domain: This refers to the domain of your server, which you set up in Step 3.
Gitea Base URL: This is the complete URL you will use to access Gitea in your web browser, including the protocol. For instance, it should resemble “https://your_domain”.
To get started, you’ll need to create a user account if you haven’t done so already. Simply click the "Need an account?" -> "Register now" link located below the login form to register a new user. Since you’ll be the first user on the system, your account will be created as an administrator. Keep in mind that if you’ve configured email settings during the setup, you might need to verify your account before proceeding.
Once you’re logged in as the newly created user, you can access additional administrative features by clicking on your user icon at the top right corner of the page. From the drop-down menu, select "Site Administration" which will take you to a page where you can perform maintenance tasks, manage user accounts and organizations, and further customize Gitea according to your needs.
Configuring SSHing Shim
You have to create SSH key for our earlier created user. This key needed only for internal use:
We used Docker virtualization for deploying Gitea on our own server in minutes and with some settings for user and adding key.
Also, we can customize front look of the Gitea web interface and set up email notification. I wasn’t show this in the article, but I’ll post in the future more stuff like that. Stay tuned 🫡